UNITY Lesson 1: Table of Contents
1a: Get Unity; Get Started
1b: Add a Character
1c: An Introduction to Scripting in C#
1d: Uniform Motion in Any Direction
1e: Move To a User-Clicked Location
1f: Background and Falling Rocks

UNITY Lesson 1c:
An Introduction to Scripting in C#

Unity's Introduction to Scripting (videos: 2 hours 45 minutes)

SCRIPTING
A script is a type of computer program (or just ‘program’, for short).

A scripting language is a programming language that controls a software application.
(Unity is an example of a software application.)
A script is code that is written in a scripting language.
Scripting refers to the process of writing a script.

In Unity, scripts tell GameObjects how to behave.
Scripts allow you to:
  • trigger game events
  • modify Component properties over time
  • respond to user input
The interactions of all scripts/GameObjects/Components creates game play.

Unity runs in a BIG LOOP:
it reads all the data in the current scene, renders a frame, repeats.
It runs this loop many times every second while the game is playing.
C# Scripting Language
Unity uses Object Oriented scripting languages (more on this later).
C# (read as ‘C sharp’) is the recommended scripting language, and the one used here.

Differences Between C# Programming Inside/Outside Unity
Experienced C# programmers should be aware: there are differences in conventions and
‘best practices’ when using C# for Unity game development.

Here's an example.
Normally, it is considered bad practice to use public fields in C# programming.
(Public fields are discussed shortly.)
Instead, C# provides an alternative mechanism (properties) which offer greater flexibility, easier upgrades between versions, more functionality, and better ability to work as a team. However, Unity only exposes public fields (not properties) in the editor.
Therefore—although public fields are generally discouraged—they are required for editing from within the Unity Editor.
Unity Scripting Reference
This is a better link than the Unity Manual, for C# scripting questions:
Unity Scripting Reference
Create Your First Script
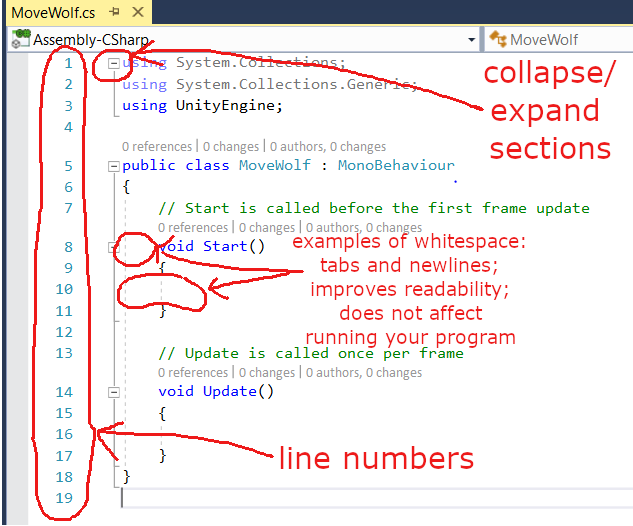
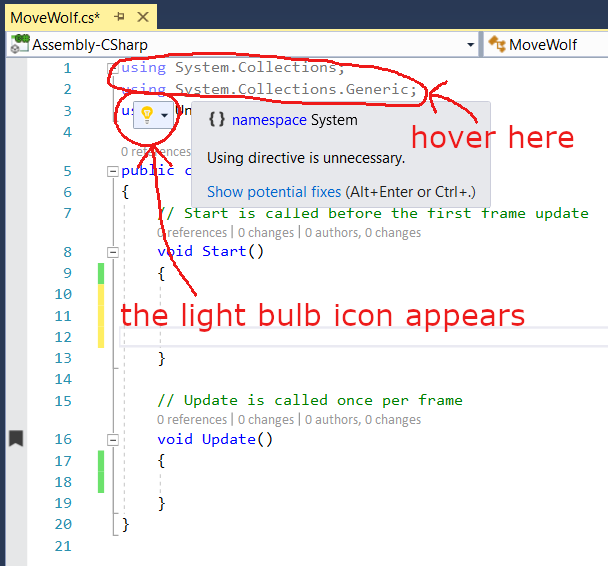
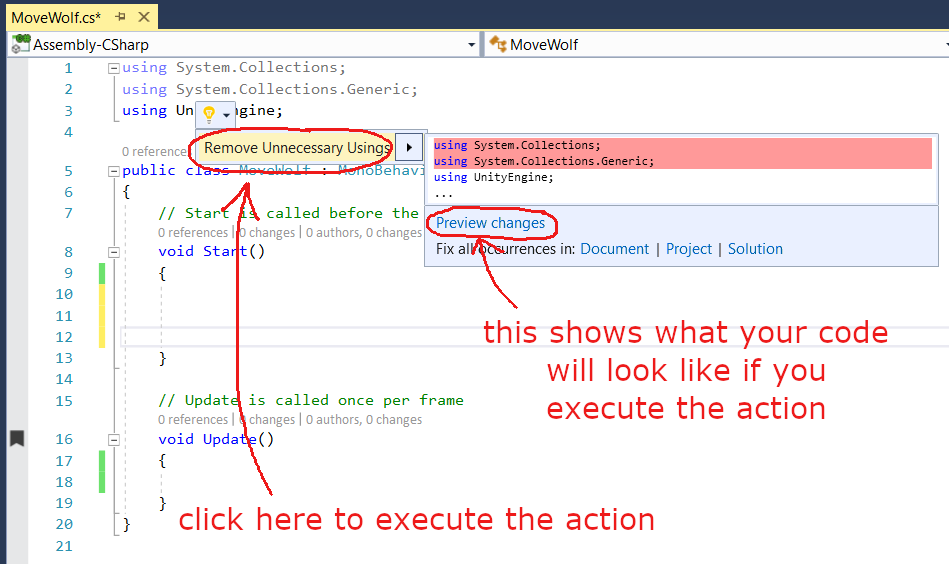
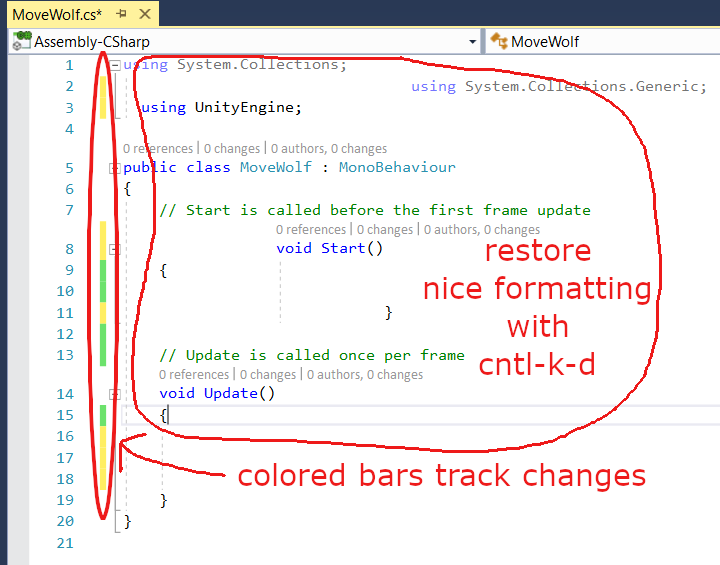
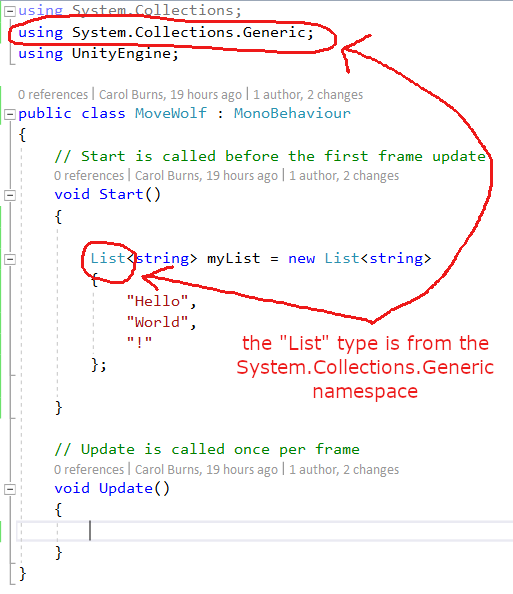
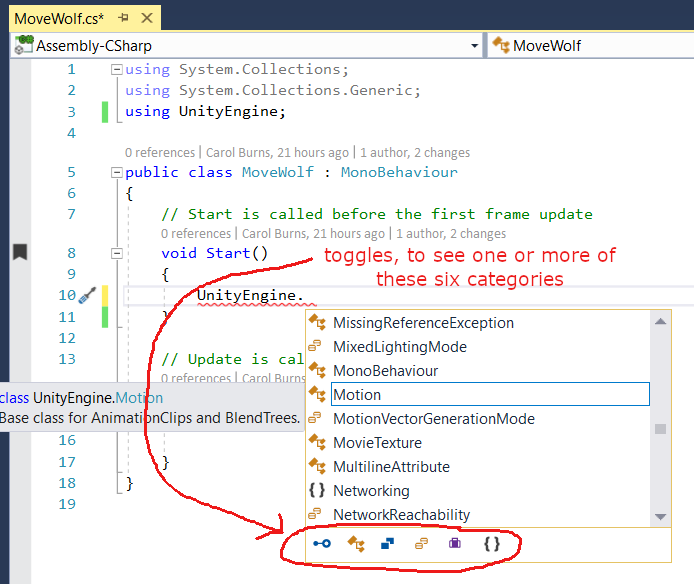
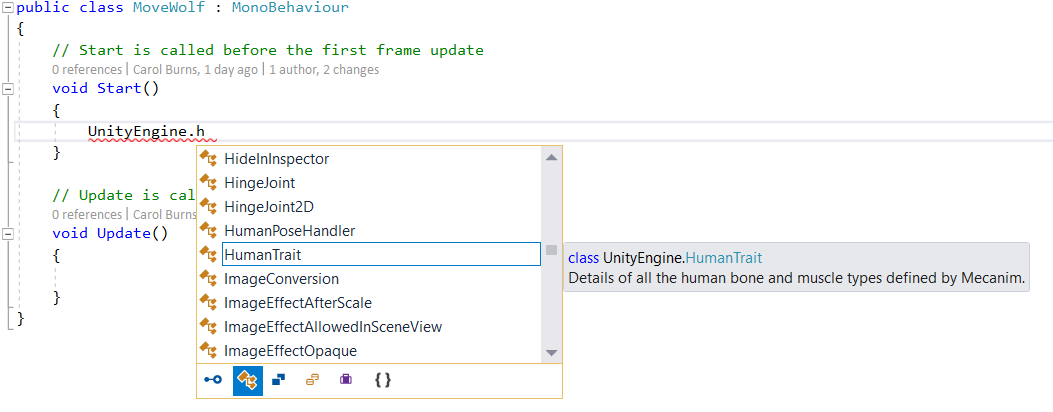
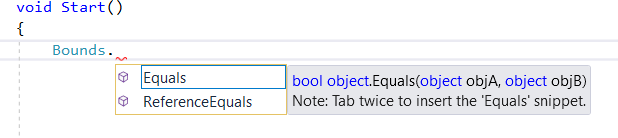
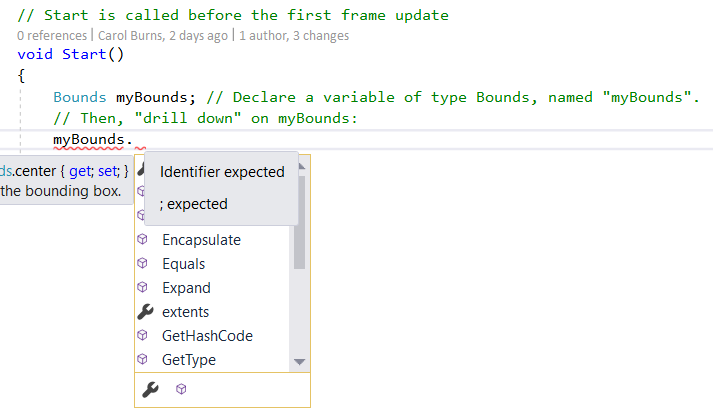
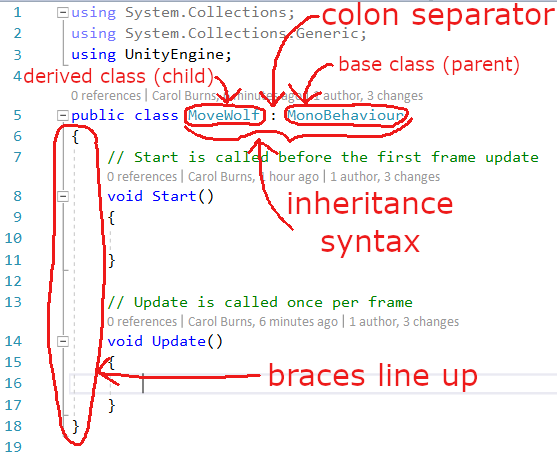
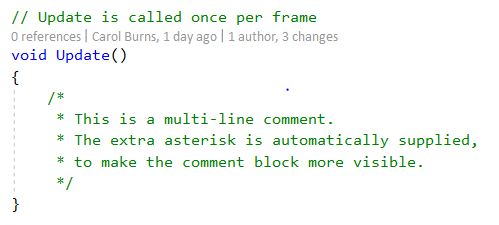
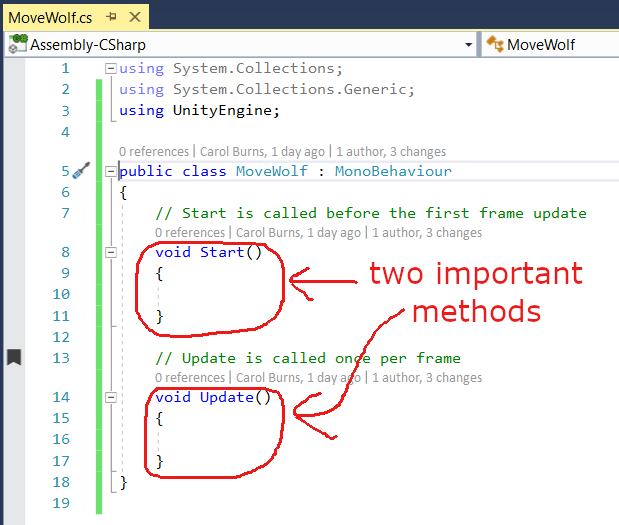
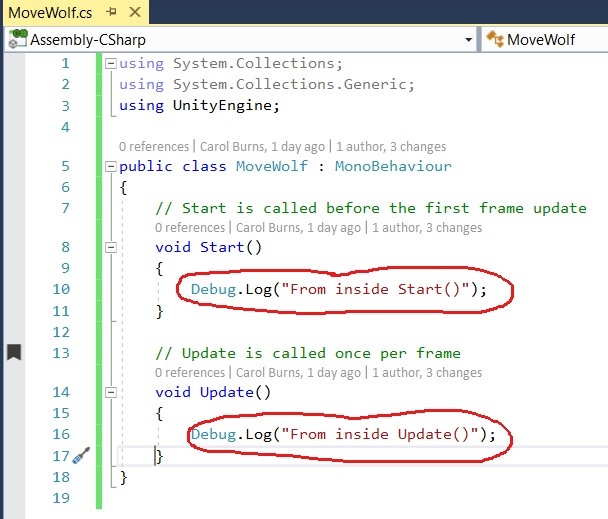
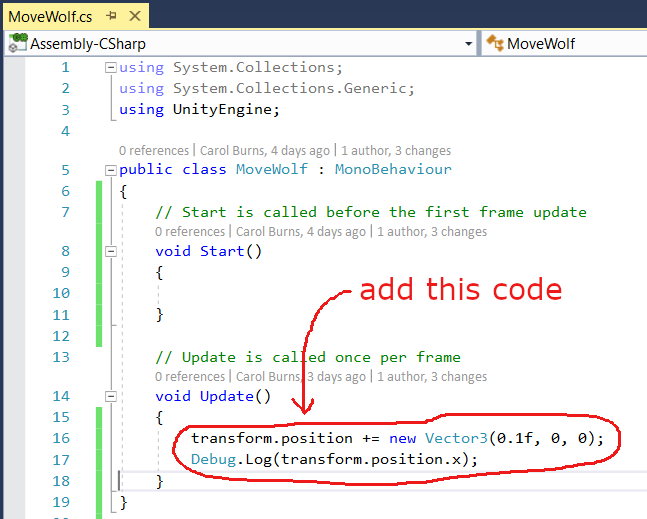
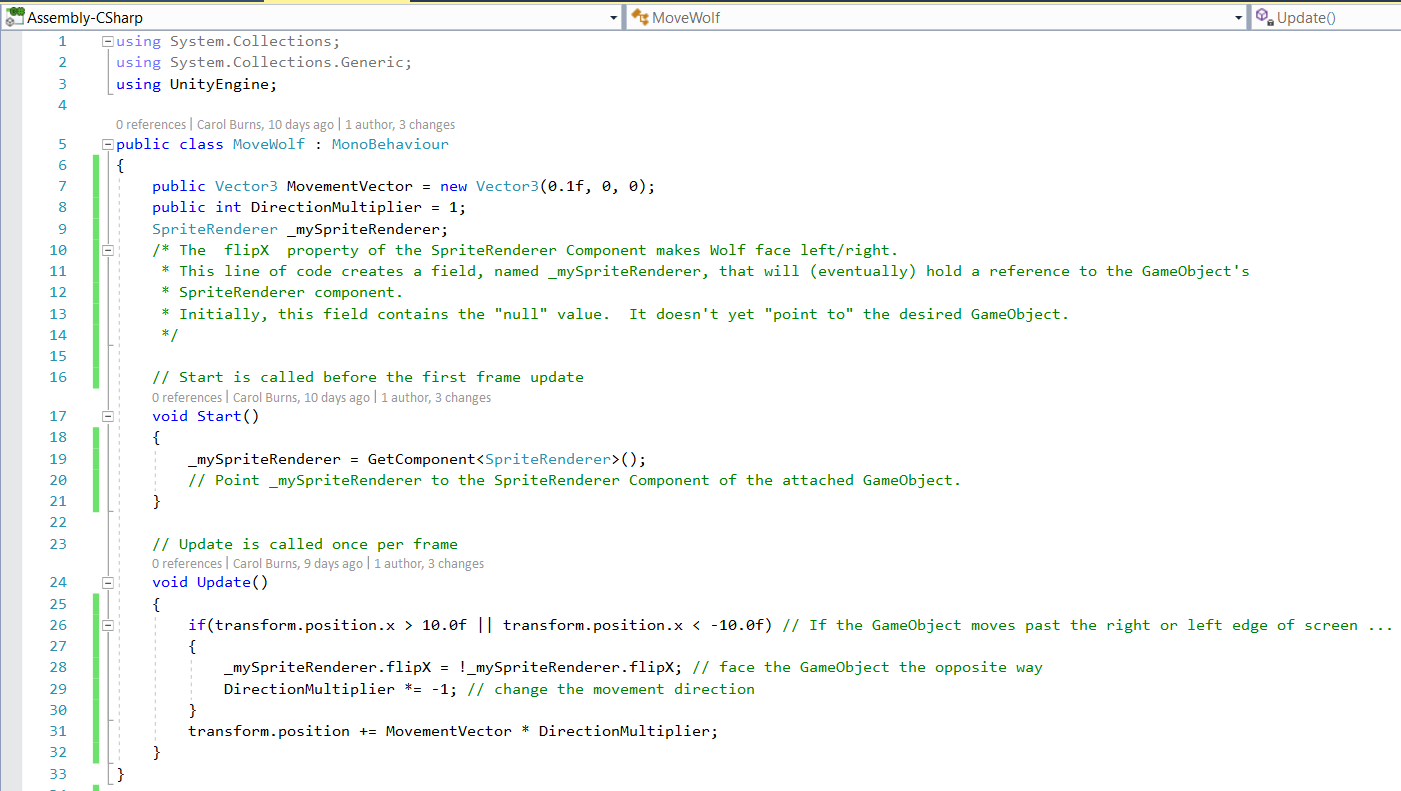
To keep files organized, create a Scripts folder in Project-Assets.
We want to create our new script in this folder, so double-click on it to move into the folder.
(Our first few scripts are for learning purposes only, and won't be used in the final game.)

(1a) Create a New Script
Main Menu-Assets-Create-C# Script
Alternatively, you can use: Project-Create dropdown menu-C# Script
There are other ways, too!
Scripts are vital to Unity, so there are lots of ways to do the same thing.

(1b) Rename the Script
The script appears with a default name, which is highlighted and ready to be changed.
Change to a meaningful name now rather than later,
since the name you enter is used to create the initial text inside the file.

Capitalize the First Letter of Script Filenames
The first letter of the filename should be capitalized: MoveWolf is fine, but moveWolf isn't.

Change the name to MoveWolf and press Enter.
After a moment, you'll see the contents of the just-created MoveWolf.cs file in Inspector.
(The ‘.cs’ filename extension stands for (for C Sharp).

(1c) Double-click MoveWolf.cs; it opens in Visual Studio.
Visual Studio offers lots of help in writing/editing scripts:
  • it helps complete code (fewer typing errors)
  • it helps detect errors
  • it formats code to make it easy-to-read
  • it puts reference material and helpful suggestions at your fingertips
We'll see all these features momentarily.


(1a) Create a new script: Main Menu-Assets-Create-C# Script
(There are other ways to create a new script.)


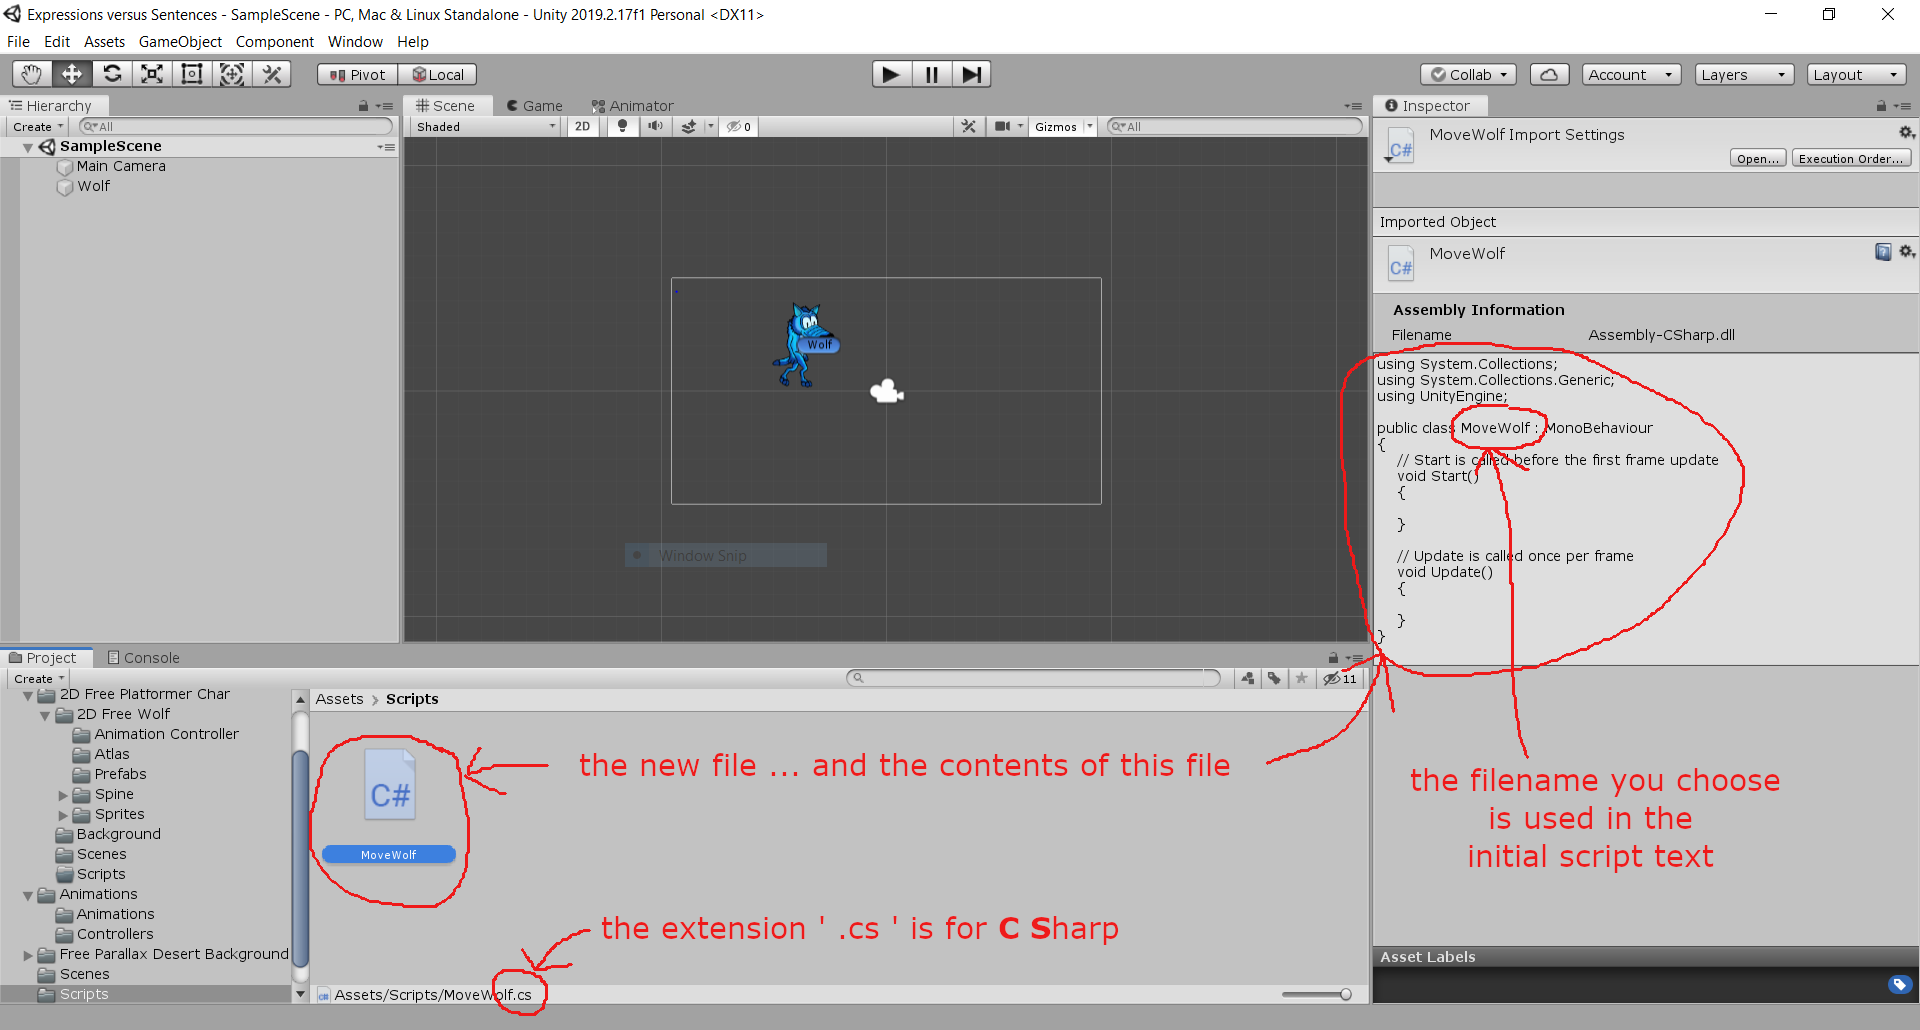
(1b) The script appears with a default name, which is highlighted and ready to be changed.
Change the name to MoveWolf and press Enter.
(Your name should begin with a capital letter.)
After a moment, you'll see the contents of the just-created MoveWolf.cs file in Inspector.
(The ‘.cs’ filename extension stands for (for C Sharp).
Note that the filename you choose is used in the initial script text.
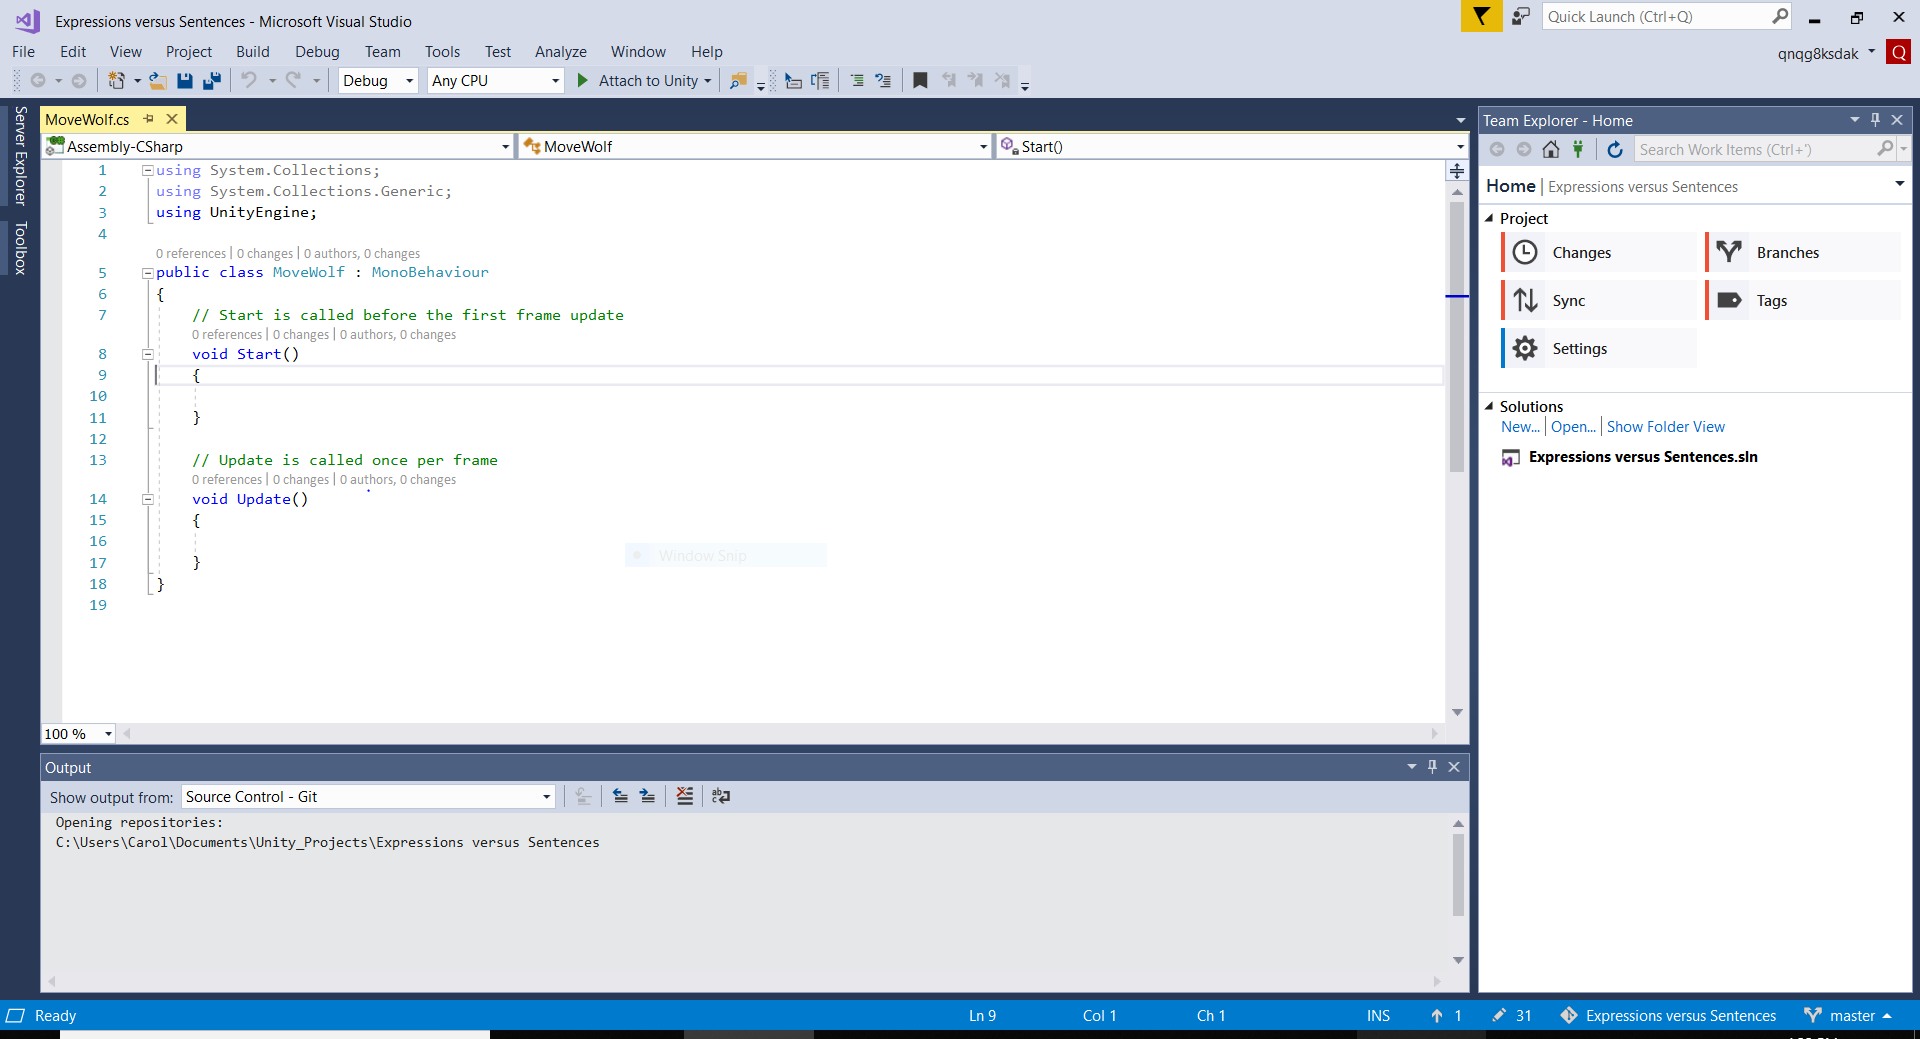
(1c) Double-click MoveWolf.cs; it opens in Visual Studio.
(Don't worry if your interface looks a bit different.)
The Need For Organization: Variables, Objects, Types, Instances, Classes, Namespaces
Let's back up for a moment and look at a common life problem:

If you live in a tiny house and have few possessions, then you can probably get away with not-too-much organization.
After all, there just isn't that much to keep track of.
(By the way, I live in a tiny house  and  I'm extremely organized!)
As you accumulate more stuff and move into a bigger house, you'd better get systems in place to remember what you have and where to find things.
Otherwise, your life could dissolve into chaos. You'll waste precious time looking for things. You'll waste money buying things you already have.

It's the same with scripting.
In the beginning, there are only a few scripts, and they're small.
But then there are more and more—and they get bigger and bigger.

Without good organizational techniques, you'll waste precious time looking for things in your scripts.
You'll find yourself using the same names for different things, which can cause errors.
You'll write code to do something that you know you figured out before—but you just can't remember where.

And, it's the same with scripting languages (like C#).
They get bigger and bigger and bigger.
C# is huge. So, C# uses a whole lot of different ways to keep itself organized and efficient.

Here are a few important features of C# (and languages like C#).
Only casual descriptions are given here—more on each as the need arises:
A First Look at a C# Script in Visual Studio
Let's take a look at the MoveWolf.cs script in Visual Studio.
Helpful Visual Studio Editor Features
First, some helpful editor features:
  • (1a) Line Numbers
    Click on a line number to highlight the line (for cutting, pasting, deleting).
  • (1b) Collapse/Expand Sections
  • (1c) Whitespace
    Spaces, tabs, and newlines are called ‘whitespace’ (since you see the white of the underlying ‘page’).
    Extra whitespace is generally ignored in C# statements—it won't affect running your program.
    However, proper use of whitespace can make your program much easier to read, for yourself and others.

    Of course, spaces are often required!
    For example, ‘class Cat’ certainly wouldn't work if typed as ‘classCat’.

(1a) line numbers: click on a line number to highlight the line
(for cutting, pasting, deleting)
(1b) collapse/expand sections
(1c) use whitespace to make a program more readable

  • Built-In Help
    You can hover (i.e., move your mouse over)
    many parts of code to see helpful information.

    (2a) Light Bulb Icons provide suggested fixes.

    (2b) Using the Light Bulb Icon
    • click the light bulb to see suggested actions
    • Preview changes  shows what your code would look like
      if you execute the action
    • click beneath the light bulb to follow the recommendation

(2a) Hover over either of the top two lines;
a helpful suggestion appears.
Click the light bulb to see suggested actions.

(2b) Here, C# lets you know
that nothing in your code requires either of the top two lines.
It recommends that you remove them.
You would click beneath the light bulb
if you choose to follow the recommendation.
  • (3a) Track Changes (Colored Bars)
    Green: line has been changed and saved
    Yellow: line has been changed, but not yet saved

    These colored bars track a single session.
    They disappear upon closing/reopening your file.

    (3b) Turn Off Track Changes
    Uncheck: Tools-Options-Text Editor-General-Track changes
  • (3c) Restore Default Formatting
    If your code gets messy, you can restore default formatting with:
    cntlk-d
    I use the notation  cntlk-d  to mean:
    while holding down the cntl key, press ‘k’, then ‘d’
    (Note: Other sources use the notation  Ctrl-K, Ctrl-D)

    Sometimes you only want to restore default formatting to a selection
    (a highlighted part of a document). You can do this with:
    cntlk-f

(3a) colored bars track changes for a single session
(3c) restore default formatting with:
cntlk-d (whole document)
cntlk-f (highlighted part of document)

(3b) If desired, you can turn off the colored bars
for tracking changes by unchecking:
Tools-Options-Text Editor-General-Track changes
The Unity C# Script ‘Skeleton’
Every new Unity C# script comes with some basic information already in place. See (1) at right.
Unity believes this ‘skeleton’ will be helpful to most people.
Here, we look at each piece of the Unity C# script ‘skeleton’:
  • Lines 1 and 2
    Using Directives
    The first three lines are officially called ‘using directives’ (because of the keyword ‘using’).
    Lines 1 and 2 are addressed first: then, special attention is given to the third line.

    using System.Collections;
    using System.Collections.Generic;
    System.Collections  and  System.Collections.Generic  are namespaces that Unity believes will be useful.

    With (say) the line  ‘using System.Collections.Generic;’  in place, whenever we use a type from the  System.Collections.Generic  namespace, a shortened version of the name will do (making the code shorter and cleaner).

    Here's an example:
    • System.Collections.Generic  contains a  List  type for making lists.
    • In (2a) below, code has been added that creates a list named  myList ,
      and then adds three snippets of text (called ‘strings’) to the list.
      (Don't worry about the details of this code right now!)
      In (2a), C# is happy.
    • In (2b) below, the  ‘using System.Collections.Generic;’  line has been removed.
      Now, C# complains.
      Red squiggly underlines indicate errors.
      Hovering over errors gives guidance as to what C# thinks is wrong.
    • In (2c) below, the full namespace description has been added.
      Now, no errors—but the code is longer and more complicated.

(1) The Unity C# script ‘skeleton’:
each line is discussed at left.

(2a) The  List  type is from
the  System.Collections.Generic  namespace.
Here, C# is happy.

(2b) If we remove the  ‘using System.Collections.Generic;’  line, C# complains.
Errors are indicated by red squiggly underlines.
Hovering over errors gives information on what is wrong:
notice that it asks if we are missing a  ‘using’  directive.

(2c) If we put in the full namespace description,
then C# is happy again.
However, the code is now
longer and more complicated.
  • Lines 1 and 2 (continued)
    Accessing Types With/Without a ‘Using Directive’
    In your scripts, you can use any type from any namespace, providing the type is in an assembly that is referenced by the project
    (which is a topic for future discussion). Then:
    WITH a ‘using directive’: you can use the short name
    WITHOUT a ‘using directive’: you must use the full namespace description

    Just a bit of information for now:
    • Assemblies are different from namespaces.
    • You can view the referenced assemblies in Visual Studio's Solution Explorer. See (2d) at right.
    • Some assemblies have names that match the names of namespaces inside them. Some don't.
    • For your convenience:
      Unity automatically references assemblies that include many of the types in the namespaces on lines 1, 2, and 3 of the skeleton.
    Restore the script to (1)
    If you're following along with an actual Unity script, then undo everything to restore what is shown in (1).
    Note: You can just hold down  cntl-z  until everything is back to normal.
    When can you delete the first two lines?
    Nothing in the Unity C# skeleton requires either of the namespaces  ‘System.Collections’  or  ‘System.Collections.Generic’ .
    (Hover over these namespaces in the skeleton to get this information.)
    Indeed, if you look ever-so-carefully in (1), you'll see that the first two lines are a bit lighter than (say) the third line—this is an indication that the editor thinks something is slightly amiss.

    If you don't use anything from  System.Collections  in your finished script, then you can delete the  ‘using System.Collections;’  line.
    Similarly with  System.Collections.Generic .

    Here are descriptions of these two namespaces from official Microsoft C# documentation:
    The System.Collections namespace contains interfaces and classes that define various collections of objects, such as lists, queues, bit arrays, hash tables and dictionaries.

    The System.Collections.Generic namespace contains interfaces and classes that define generic collections, which allow users to create strongly typed collections that provide better type safety and performance than non-generic strongly typed collections.
    I put these in small type, because you likely won't need this information for a while.
    FYI, here is official documentation on the ‘using’ directive.
    Deprecated stuff
    To ‘deprecate’ means to express disapproval.
    In software development, ‘deprecated’ refers to things that should no longer be used: often, they are replaced by newer versions.
    Sometimes, you can still use deprecated code—but at your own risk! It may not be supported in the future.

    Almost everything in the  System.Collections  namespace is deprecated.
    The  System.Collections  namespace remains in the skeleton due to only a small amount of commonly-used stuff that it contains.
    Two Totally Different Namespaces
    By the way,  System.Collections  and  System.Collections.Generic  are two totally different namespaces.
    There is no overlap in the class information that they contain.
    The notation might (mistakenly) lead us to believe that the set of classes in  System.Collections.Generic  is a subset of those in  System.Collections . Not so!

(2d) In Solution Explorer,
you can view the referenced assemblies.
Only a few are shown here.
  • Line 3
    using UnityEngine;
    The  UnityEngine  namespace is the only namespace used by the Unity C# skeleton.
    The  UnityEngine  namespace contains most of the stuff you'll need in your scripts for Unity game development.
    What is in the  UnityEngine  namespace?
    See (3a) at right.
    To get a sense of the enormous amount of stuff in the  UnityEngine  namespace,
    do the following:
    • move your cursor inside the braces in (say)  ‘void Start() { }
    • type:  UnityEngine.
      (The period at the end is essential for our purposes here.)
    You'll see an alphabetical list of everything in the UnityEngine namespace!
    Toggle buttons (at the bottom) allow you to view only one (or more) of the six categories.
    Six Different Icons in the  UnityEngine  Namespace
    class: types defined using the  class  keyword
    enum: used to declare a list of named integer constants
    namespace: you can nest namespaces
    delegate: useful for working with events (more in later lessons)
    struct: similar to a class (but different; more in later lessons)
    interface: similar to a class (but different; more in later lessons)
    Drilling Down ... (see 3b below)
    After typing:
    UnityEngine.

    start typing the letters for what you want (if you know what you want).
    (You can just type all lowercase letters; don't worry about capitals at this point.)
    If you don't know what you want, use the up/down arrow keys to go through elements in the list.

    When an entry you're interested in is highlighted, press  Enter .
    (I selected the  HumanTrait  class.)
    Note: Mecanim is Unity's built-in animation system.

    After typing another period, I saw two new icons:
    property: a flexible mechanism to read/write/compute values (more in later lessons)
    method: A method is like a mini-program inside your script (more in later lessons).
    A method is similar to a mathematical function: it takes one or more inputs,
    does something with them, and (usually) gives an output.
    Method names always end with parentheses.
    Inside the parentheses, you may have none, one, or more than one input.
    Note: You may see different icons, depending upon your selection.
    Drilling Down More ... (see 3c below)
    Continuing in this manner, you can:
    • see lots of things that  UnityEngine  has to offer
    • get brief descriptions
    • get syntax for correct usage (once you learn how to interpret the given information)

(3a) The  UnityEngine  namespace contains an enormous amount of stuff!
Toggle buttons (at the bottom) allow you to view only one (or more) of the six categories.

(3b) Highlight an entry and then press  Enter .
Note the  class  icon highlighted at bottom; so, only  class  entries are showing.

(3c) Keep drilling down to see what  UnityEngine  has to offer.
Drilling Down ... May Need a Bit of Help
As you seek C# help in Visual Studio, you may sometimes be left shaking your head, thinking:

Really?!?! Is that all there is?

Here's an example.
UnityEngine  contains a type called  Bounds .
If you seek help as in (4a) at right, only two methods are offered.
Really? Is this all that  Bounds  has to offer?

There are reasons (involving static versus non-static methods) that you aren't seeing more.
However, these reasons are beyond the current scope.

For now, just know that you can likely get the information you really want,
by declaring a variable of type  Bounds ,
and then ‘drilling down’ on this variable. See (4b) at right.

Notes:
  • Ignore any squiggly underlines during this process.
    For example, after you type  ‘Bounds myBounds;’ 
    but before you type  ‘myBounds.’ 
    you'll get a complaint that you've declared a variable, but haven't (yet) used it.
  • The name  myBounds  can be almost anything.
    It's just convenient to take the type name and stick a ‘my’ in front of it.

(4a) Really?
Is this all that  Bounds  has to offer?


(4b) More offerings!
(The ‘// stuff’  are comments to help you understand the code.)
The Unity C# Script ‘Skeleton’ (continued)
Reference and Change Information
Between lines 4 and 5, on an un-numbered line, is information in a light grey color.
(Similar information appears between lines 7-8, and between lines 13-14.)
  • First part: Reference Info
    The first part tracks the number of references there are to whatever appears on the next line.
    To illustrate:
    In (2a) below, I started to add a line that uses the MoveWolf class;
    the number of references changed from $\,0\,$ to $\,1\,.$
  • Second part: Git Commit Info
    If you created a Git Repository, then this second part tracks the number of commits.
    (A commit saves your changes to the local repository.)
    You can hover or click on the second part for different levels of information.
    I took image (2b) below almost immediately after a commit.
    (For me, the display did not change until I closed the file and then re-opened.)
  • Third part: Git Commit Details
    The third part gives additional information on Git commits.
    Again, you can hover or click for different levels of information.

(1) The Unity C# script ‘skeleton’:
discussion of each line is continued at left.

(2a) First part: How many references are there
to whatever appears on the next line?

(2b) Second part: status of Git Commits

(2c) Third part: more detail on Git Commits
  • Lines 5, 6, and 18
    public class MoveWolf : MonoBehaviour {     }
    Unity created a class for you.
    The class name, ‘MoveWolf’, came from the filename:  MoveWolf.cs
    Notice how the braces on lines 6 and 18 line up in (3) at right.
    The contents of the  MoveWolf  class go inside these braces.

    The  ‘public’  keyword is an access modifier for types and type members.
    FYI:
    Type members define storage locations and executable code.
    Some examples of type members are methods, constructors, events, constants, fields, and properties.
    Public access is the most permissive access level.
    There are no restrictions on accessing public members.
    Inheritance
    Inheritance is a fundamental feature of object-oriented programming languages.
    Inheritance allows you to define a derived class that reuses, extends, or modifies the behavior of a base class.

    As seen in (3), inheritance uses a colon syntax:   ‘ :
    The derived class appears to the left of the colon; the base class goes on the right of the colon.

    More precisely:
    • Base Class
      The base class provides specific functionality.
      The base class is sometimes referred to as the parent class.
    • Derived Class
      A derived class reuses or overrides the functionality of the base class.
      A derived class is sometimes referred to as a child class.
      The derived class is said to inherit functionality from the base class.
    For us:
    • The base class is:  MonoBehaviour
      (Note: behaviour is the British spelling of the word behavior.)
      MonoBehaviour  is a built-in class in Unity.
      When you hover over the  MonoBehaviour  keyword, you see:
      ‘MonoBehaviour is the base class from which every Unity script derives.’
    • The derived class is:  MoveWolf
      The  MoveWolf.cs  script makes its connection with the internal workings of Unity
      via this  MoveWolf  class that derives from  MonoBehaviour .

(3) Note how the braces on lines 6 and 18 line up.
The contents of the  MoveWolf  class go inside these braces.

Inheritance sets up a parent/child relationship,
where the child inherits functionality from the parent.
Important Perspective:
A Script Creates a User-Defined Component
that can be Attached to a GameObject
  • A Script Creates a User-Defined Component
    Remember the  Components  on our GameObjects?
    A Unity C# script creates a user-defined  Component
    via the class that inherits from  MonoBehaviour.
  • Attaching a Script to a GameObject
    To ‘activate’ the functionality that a script provides,
    just attach an instance of the script to a GameObject, as follows:
    • drag the script from the Project window ...
    • ... to the GameObject in Hierarchy
    Notes:
    • If the GameObject is selected, then you can alternatively drag the script
      to the bottom of the Inspector window.
    • A script can be attached to multiple GameObjects.
  • Do it now! (see (4a) at right)
    Drag the  MoveWolf.cs  script from the Project window onto Wolf in Hierarchy.
  • The User-Defined Component Appears in Inspector (see (4b) at right)
    • A new Component appears in Inspector.
    • The new Component takes its name from the class/script.
      Note:
      The class/script names must be the same, or you'll get an error.
    • Unity modifies the name slightly for the Inspector Component.
      A space is introduced wherever a capital letter occurs.
      Example:
      The Component created by  MoveWolf.cs  appears in Inspector as Move Wolf .

  • Requirements for Attaching a Class to a GameObject as a Component
    For emphasis, there are two main requirements for a class to be attached to a GameObject as a Component:
    • The class must inherit from the  UnityEngine  class  MonoBehaviour.
    • The class name and file name must be the same.
      You could conceivably change the filename and/or class name.
      If you do, make sure you change them both to exactly the same thing.

(4a) Drag the  MoveWolf.cs  script
onto Wolf in Hierarchy.

(4b) After dragging the script onto Wolf,
this new Component appears.
For the Component name, a space is introduced
wherever a capital letter occurs
in the class/script name.
Comments
  • Lines 7 and 13
    Comments can make your code more understandable, for yourself and others.
    Single-line and multi-line comments are ignored at run time—they are for user benefit only.
    • Single-Line Comments
      Single-line comments start with two forward slashes:   ‘ //
      Single-line comments can occupy a single line by themselves.
      Alternatively, single-line comments can go after some code on a single line.
      Any text between   //   and the end-of-line is ignored by C#.

      See (5a) at right for an example of a single-line comment and code sharing the same line.
      Note all the symbols that can be used in a single-line comment.
    • Multi-Line Comments
      Multi-line comments start with   /*   and end with   */  .
      Any text between   /*   and   */   is ignored by C#.
      See (5b) and (5c) at right.
    • Keyboard Shortcuts for Commenting/Uncommenting
      A highlighted selection can be commented using  cntlk-c .
      (The ‘c’ is for comment.)

      A highlighted selection can be uncommented using  cntlk-u .
      (The ‘u’ is for uncomment.)
    Note:
    C# has a third type of comment, called a documentation comment.
    Documentation comments are specially-formatted comments to produce documentation about the code to which they are attached.

(5a) Single-line comments start with two forward slashes.
They can occupy a single line by themselves,
or they can go after some code on a single line.


(5b) Multi-line comments go between   /*   and   */  .
The ‘block’ style shown here makes them really stand out.


(5c) You don't have to use the ‘block’ style shown in (5b).
The Unity C# Script ‘Skeleton’ (continued)
Only two parts of the skeleton remain to be investigated.
This is where the fun stuff happens!

Two methods (also called functions) appear inside the MoveWolf class:
  • Lines 14–17:   Update() { }
    The  Update()  method is the place to put code that needs to be handled over time during gameplay: movement, triggering actions, responding to user input, and so on.

    When Unity goes through its ‘loop’, it looks in every script.
    Whenever it finds an  Update()  method, it runs that code before rendering the new frame.
    The time between  Update()  calls can vary, depending upon what is currently going on.
    The example below will give you a sense of how many times  Update()  is called!

    Note:
    There is also a  FixedUpdate()  method that provides uniformly-spaced call intervals.
  • Lines 8–11:   Start() { }
    Some initialization work is done in the  Start()  method.
    Before any game action takes place, you may need to do things like set up variables,
    read preferences, or make connections with other GameObjects.
    The  Start()  method is called only once, before gameplay begins.
    In particular, it is called before the  Update()  method is called for the first time.
The Void Keyword
On lines 8 and 14, before each method name, you see the  void  keyword.
In this context, the  void  keyword means that these methods do not return a value.
The methods simply execute the code inside their code block—that is, inside the braces  { } .
More information on methods will appear shortly, as we get Wolf moving across the screen.
EXAMPLE:   Start()  and  Update()  In Action
Debug.Log()  is a simple command that prints a message to Unity’s console output.
The  Console  tab is next to the  Project  tab in the Unity editor. See (2) at right.

Do the following:
  • Add Two Lines of Code
    Add the two lines of code circled in (3a) at right.
    Start typing—then save time (and prevent typing errors)
    by using the ‘code completion’ that is offered.
    (Information on what you're typing is given below.)
  • Play Your Game; Stop After a Couple Seconds
    From within the Unity Editor, with the  Console  tab open and cleared, play your game.
    You'll see messages being written to the  Console  area.
    After a couple seconds, stop playing the game.
  • Look at the Console Messages
    See (3b) at right.
    Scroll to the top of the  Console  area.
    You'll see one message (at the very top) from  Start() .
    You'll see many messages from  Update().
    Update()  is called many times each second!
Modifying a Script
When you play a game in the Unity Editor, Unity looks at every script in the Assets folder and notes the date/time that each was modified. As long as you've saved your script after making changes, the script will be re-imported and the changes applied.

(1) two methods inherited from  MonoBehaviour


(2) the  Console  tab


(3a) add the two lines of code circled here


(3b) play your game; you'll see this console output
Statements; Strings
Here is some information related to the  Debug.Log()  lines you typed above.
Statement
The actions of a program are expressed using statements.
C# statements generally must end with a semicolon:  ‘  ; ’
Exception:
Statements ending with a block { } do not use a semicolon after the block.
String Literal
A string literal is a sequence of characters enclosed in double quotation marks:   "   "
A string literal is often more simply referred to as a string.

Since a double quote terminates the string, you must use

  \"  (a backslash, followed by a double quote)

to actually see a double quote in your output.
In this context:
  • the backslash  \  is called an escape character
  •  \"  is called an escape sequence
Some other useful escape sequences are illustrated in the examples below:

this string literal ... ... produces this output comment
"a b   c     d" a b   c     d spaces are preserved inside string literals
"\\ is a backslash" \ is a backslash use  \\  for a literal backslash
"She said \"Hello\"!" She said "Hello"! use  \"  for a literal double quote
"this is\n a newline" this is
 a newline
use  \n  for a newline
"this is\na newline" this is
a newline
any space after  \n 
produces literal space in the output
  • If you just start a string with a double quote, then C# honors this old C/C++ syntax that uses the  \  escape character.
  • Alternatively (as shown in (4a) and (4b)), you can use C# 's new/improved string syntax,
    which is invoked using an  @  before the leading double quote:
    • To get a double-quote with the ‘ @ ’ syntax, you must put two consecutive double-quotes.
    • Everything else is taken exactly as typed (including spaces, newlines, backslashes).

(4a) illustrating the “ @ ” syntax for strings


(4b) The  Debug.Log()  statement in (4a) produces this Console output.
Only two lines show initially in the Console;
when you click on the Console entry, the entire message appears at the bottom.
Get Wolf Moving Across the Screen
With the current state of our game, Wolf is indeed ‘moving’, since we've endowed it with an animation.
However, it's just moving in place. It's not changing position on the screen.
Next, we'll get Wolf moving left-to-right across the screen.
In the process, more fundamental concepts are introduced.

Eventually, we want Wolf to respond to user input:
when a user clicks anywhere on the screen, Wolf should move to that location.
But, we need to practice with simpler code first.

Note:
There are different—and better—ways to move.
The basic code discussed on this web page is for learning purposes.
Methods
The time has come for a more precise discussion of methods.
What follows is information on methods from the official Microsoft C# documentation.
The green text specializes to the C# script skeleton, which is repeated in (1) at right.

  • Methods are declared in a  class  or  struct .
    (We'll talk about the  struct  construct when it is needed.)
    Our two methods,  Start()  and  Update() , are declared inside the  MoveWolf  class.
  • The syntax for a method is shown below. Details appear in the next few bullets.

    SYNTAX FOR A METHOD
    (1) (2) (3) (4) (5) (6)
    optional:
    access level
    optional:
    modifiers
    return value,
    or  void 
    method name parentheses:
    method parameters
    (if any) go inside
    braces:
    method statements
    go inside
        void Start () { }
        void Update () { }
    Parts (1)–(5) comprise the so-called method signature.
  • (1)
    Optional access level, such as public or private. The default is private.
    Start()  and  Update()  both take the default access level: private.
    Private means access is limited to the containing type.
    Our containing type is the  MoveWolf  class.
  • (2)
    Optional modifiers, such as  abstract  or  sealed .
    (Don't worry about this for now.)
  • (3)
    The return value, or  void  if the method has no return value.
    Start()  has no return value.
    Update()  has no return value.
  • (4)
    The method name.
    Our method names are  Start  and  Update .
    Sometimes, discussions include parentheses after the name, to emphasize that you're dealing with a method.
    For example, a discussion might say  ‘Start()’  instead of  ‘Start’ .
  • (5)
    Any method parameters.
    Method parameters are enclosed in parentheses and separated by commas.
    Empty parentheses indicate that the method requires no parameters.
    Start()  does not require any parameters.
    Update()  does not require any parameters.
  • (6)
    The method body.
    A block of code (or a code block ) is a series of statements (none, one, or more than one) surrounded by curly braces.
    The method body is a code block.
    Among other purposes, code blocks limit the scope in which a variable can be used:
    a variable is only accessible in the block in which it is defined.

(1) the C# script skeleton
Only One Line of Code is Needed to Move Wolf Left-to-Right
Every GameObject has a Transform Component. See (2) at right.
Consequently, Unity has made it extremely easy to work with Transform Components in code.

Only one line of code is required to make Wolf move left-to-right.
However, we'll include a second line to better understand what is happening with this movement.
Put Two Statements Inside Update()
As shown in (3) at right, put two statements inside Update().
Again, use code completion.
Start typing; then press Enter after making your selection.
Play the Game
Save the script after making the changes, and then play your game.
Watch Wolf move from its current position to the right of the screen!

Look at the  Console  output (see (4) at right).
On each call to  Update() , the $x$-value of Wolf is being written to the  Console .
When the play button was pressed, Wolf had a starting $x$-value equal to $\,-3\,.$
The  Console  is showing: $\,-2.9\,,$ $\,-2.8\,,$ $\,-2.7\,,$ and so on.
On each frame, $\,0.1\,$ is being added to the $x$-value.

Of course:
  • Wolf just goes off the screen and keeps on going.
  • Wouldn't it be cool if Wolf hit the right, changed direction, hit the left, changed direction ...
    You get the idea!
After understanding the initial two lines of code, we'll implement this other desired behavior.
(It's a good warm-up to the more complicated coding we'll do in the next part of this lesson.)

(2) A typical Transform Component.
For me, Wolf has a starting $x$-value of $\,-3\,.$


(3) code to move Wolf left-to-right
(and to better understand what is happening)


(4) Console output after playing the game with the new code added
Understanding the ‘Move Right’ Code
We now explore the concepts needed to understand the two lines of code circled in (1) at right.
  • Computer Programming Assignment Statements
    In computer programming, an assignment statement sets and/or resets
    the value stored in the storage location(s) denoted by a variable name.

    More simply (but less precisely): An assignment statement puts stuff into a variable.
    (Remember: a variable holds information.)

    Some of the earliest syntax for an assignment statement (many years ago!) was:

    x ⇐ stuff

    Here,  x  is the variable, and  stuff  gets put into the variable.
    The arrow  ‘’  made it very clear that  stuff  was going into  x .

    Over the years, the syntax simplified to its current (and more obscure) form:

    x = stuff;

    However, the meaning has not changed.
    The left side  (x)  is still a variable (which corresponds to some storage location(s) in memory).
    The right side  (stuff)  still gets put into the variable.
    The right side is being assigned to the left side, hence the name of the statement.

    In most computer languages, the assignment statement is both common and important.

(1) Time to understand these two lines of code!
  • Coding Shorthand
    In C# (and other computer languages):
    x += stuff;
    is a shorthand for:
    x = x + stuff;
    Thus:
    transform.position += new Vector3(0.1f, 0, 0);

    is a shorthand for:

    transform.position = transform.position + new Vector3(0.1f, 0, 0);


  • Math Meaning of (say) $\,x = x + 1\,$
    In mathematics, $\,x = x + 1\,$ is a sentence that is always false.
    A number $\,x\,$ lives somewhere on a number line.
    The number $\,x + 1\,$ lives one unit to the right of $\,x\,.$
    A number can't live at two different locations at the same time!
  • Computer Programming Meaning of  x = x + 1
    This is an assignment statement.
    Working from right-to-left:
    • First, look to the right of the equals sign.
      Take the current value of  x  and add $\,1\,$ to it.
      (Of course, we're assuming that the variable  x  holds numbers.)
    • Now, look to the left of the equals sign.
      Take the  x + 1  that was just computed, and put it back in  x .
      The net effect is that the number being ‘held’ by  x  gets $\,1\,$ added to it.
  • transform.position
    The Inspector-Transform-Position Component is referred to, in C# code, by:  transform.position 
    In C# code,  transform.position  holds a three-dimensional vector, like (say) $\,(-3,2,9)\,.$
    There is no easy way, in C# code, to access a single coordinate of  transform.position  for the purpose of changing it.
    If you want to change any part of the  transform.position  vector, you must work with all three coordinates at once.
  • float
    The real numbers can be represented as decimals:  finite, infinite repeating, or infinite non-repeating.

    Computers can only work with finite decimals.
    For example, a computer can never exactly represent $\,\frac 13 = 0.33333...\,$
    By using more memory, computers can work with numbers with more decimal places.

    float  is a C# numeric type.
    A  float  gives about six to nine digits of precision.
    This is enough for most game development needs.
  • Vector3
    For us, Vector3  is a Unity-defined type that contains three ordered floats, corresponding to the vector $\,(x,y,z)\,.$
    See (2) at right.

    You can't put numbers into any  Vector3  component that require more memory than a float,
    since there's not enough memory set aside to hold them.
    (If you put in numbers that require less memory, that's fine.)

    Note:
    The standard C# libraries also include a class named  Vector3 .
    If we wanted to access the C# class in our current code,
    then we'd need to include the full namespace:   System.Numerics.Vector3
  • Giving Number Inputs in C#
    In C#:
    • a decimal input without any letter next to it (like  0.1 )
      is considered a double, and requires 8 bytes of memory
    • a decimal input with an ‘f’ or ‘F’ next to it (like  0.1f  or  0.1F)
      is a float, and requires 4 bytes of memory
    Since vectors require floats, our input had to be coded as:  0.1f
  • The  new  Operator; Constructors
    The   new  operator creates a new instance of a type, typically by invoking a constructor of the desired type.

    A constructor is a method whose name is the same as the name of its type.
    The  Vector3  constructor being used in our code is:

    Vector3(float x, float y, float z);
    See (2) at right.
  • Adding Vectors
    Vectors are added by adding the individual components: $$ (x_1,y_1,z_1) + (x_2,y_2,z_2) := (x_1+x_2\,,\, y_1+y_2\,,\, z_1 + z_2) $$ The symbol  ‘$\,:=\,$’  means ‘equals, by definition’.
  • Putting It All Together
    So, the line of code

    transform.position += new Vector3(0.1f,0,0);

    increases the $x$-value of Wolf 's Transform Component by $\,0.1\,$ each time  Update()  is called.
    Then,
    Debug.Log(tranform.position.x);

    writes the current (just-increased) $x$-value to the console.

    Note:
    With this code, Wolf moves at different speeds on faster/slower computers.
    A faster computer calls  Update()  more times each second, so Wolf moves faster.
    There are solutions to this frame rate dependence, which will be discussed later on.

(2) hovering over  Vector3 
gives information on the  Vector3  constructor
Improving the ‘Move Right’ Code
At right, some changes have been made to the code to:
  • conform to good coding practices
  • illustrate new concepts
Conform to Good Coding Practices
The vector  (0.1f,0,0)  is an example of a constant.
A constant (as opposed to a variable) is a number that does not change—its value is constant (hence the name).
Whenever you find yourself typing a literal number (like $\,0.1\,$ or $\,-9\,$) into your code, that's a constant.

Put Constants at the Top of a Class
It's good coding practice to put constants at the top of a class (before any methods), for these reasons:
  • It makes constants more visible, easier to find, and easier to change in your code.
    Meaningful names are also recommended.
  • It makes the constants available to all methods in the class.
  • Only one  new  operator needs to be invoked.
    For example, when  new Vector3(0.1f,0,0)  previously made its appearance inside  Update() ,
    then the  new  operator was invoked on every frame update.
Fields
In line 7 of (1) at right, a field has been used to ‘hold’ the constant vector  (0.1f,0,0) .

Here is some information on fields.
The green entries specialize to line 7:
  • A field is a variable of any type that is declared directly in a class or struct.
    (In particular, a field cannot be declared inside a method.)
    The  WolfMotionVector  field has type  Vector3 .
    The  WolfMotionVector  field is declared inside the  MoveWolf  class.
    Note that the field declaration does not occur inside either of the two methods,  Start()  or  Update() .
  • Fields store data in object instances of a class/struct.
    The data lasts as long as the object exists.
  • Fields are members of their containing type.
    WolfMotionVector  is a member of the  MoveWolf  class.
  • Fields are declared in the class block by specifying the access level of the field, followed by the type of the field, followed by the name of the field.
    A simple declaration of our  WolfMotionVector  field would look like this:

    public Vector3 WolfMotionVector;

    The rest of line 7 is an (optional) initialization.
  • Fields are available to all methods in the same class.
    We're using  WolfMotionVector  in the  Update()  method.
  • Standard C# naming conventions dictate that public fields should begin with a capital letter.
    We named our field  WolfMotionVector , not (say)  wolfMotionVector .

(1) code changes to:
conform to good coding practices,
illustrate new concepts
Field Declaration/Initialization Syntax
The green text again specializes to line 7.

FIELD DECLARATION/INITIALIZATION SYNTAX
(1) (2) (3) (4) (5) (6)
optional optional initialization
access level type of field name of field assignment operator varies for different types semicolon
public Vector3 WolfMotionVector = new Vector3(0.1f,0,0) ;
  • (1)
    By making a field  public , it is available inside the Unity Editor. See (2) and (3) at right.
    The default access level is  private .

    If you change field values from within Unity in Edit mode, these values take precedence over your C# script values.
    Be careful about this!
    More than once, I've found myself scratching my head: ‘What?!?? This shouldn't be happening!’
    only to realize that my script was using different field values, which had been set from the Unity Editor.
    (As usual, edits you make while in Play mode are discarded.)
  • (2)
    The type of field determines the amount of memory needed, and allows Visual Studio to give context-specific help.
  • (3)
    Ray likes to begin private field names with an underscore.
    (However, you should never begin a public field name with an underscore.)
    If you don't need access from the Unity Editor, make your fields private and use this underscore convention.
    Then, when using code completion, all the underscores are grouped together, making it much easier to locate your own fields.
  • (4) and (5)
    It's often convenient to initialize values at the same time you're declaring a field.
    Note:   Integers ($\, ...,-3,-2,-1,0,1,2,3,...\,$) can be used where a  float  is expected.
  • (6)
    Field declarations end with a semicolon.

(2) Public fields in C# scripts are available in Unity.
They can be changed in Edit Mode or Play Mode.


(3a) Unity inserts spaces before capital letters for Inspector use.
(3b) You can change field values from the Unity Editor.
(3c) Reset  to your C# script values using the dropdown menu.
Field Declarations Versus Statements
A field declaration ends with a semicolon, just as a statement (usually) ends with a semicolon.
However, a field declaration is not a statement.

A compiler is a program that converts a programming language into a lower-level form, so that it can be understood by a computer.
Field declarations tell the compiler the fields in a class.
The order that the declarations appear is irrelevant (although they're usually grouped together at the top of the class).
Statements, however, are executed sequentially.

Here's a way to think of it:
Alphabetizing a random collection of words doesn't lose any content.
Alphabetizing the words in the sentence ‘Carol and Ray enjoy working on Unity game development together’ destroys the usefulness of the sentence.
Similarly:
  • Reorganizing the member declarations in a class or the classes in a file doesn't lose any content.
  • Reorganizing the statements in a method most likely renders the method useless.
Code Refactoring
Code refactoring refers to editing/cleaning up code, without changing code function.
Changing a Field/Variable Name
If you decide to change a field/variable name, it could potentially be a big nuisance to make sure you locate all occurrences in your code.

Renaming a field/variable is one type of code refactoring.
Fortunately, Visual Studio makes it really easy, as follows:
  • Let's illustrate by renaming  WolfMotionVector  to  WolfMovementVector .
  • Click on the field/variable name and start editing it.
    A dotted box appears. See (4) at right.
  • Once you've got your new name (and while the dotted box is still visible), either
    • use the keyboard shortcut  cntl-.  (the control key held down and the period key pressed); OR
    • click the light bulb icon
    You'll see ‘Rename’ information appear.
  • Press:  Enter 
    Voila! All appearances of the field/variable have been changed in your code.

(4) Visual Studio makes it really easy to rename fields/variables.
Moving Wolf Back-and-Forth Across the Screen
Now, we want to implement more advanced movement:
  • When  Wolf  hits the right side of the screen,
    we want it to turn around and run left.
  • When  Wolf  hits the left side of the screen,
    we want it to turn around and run right.
  • We want this motion repeated forever and ever.
The (well-commented) code shown in (1) at right will do the job.

Feel free to study the script on your own (before reading the material that follows) and see if you can figure out what it does.
Type it all into your own C# script and play your game!

Below, we'll talk about the new information that appears in the script:
  • referring to Components (other than the Transform Component)
    in C# scripts
  • the  if() { }  statement
  • booleans, and boolean operators
  • multiplying a vector by a constant

(1) the code to move  Wolf  back-and-forth repeatedly;
a text file containing this MoveWolf code
Make Your Code General
You should strive to make your scripts as general as possible, for potential future reuse.
I initially chose names like  ‘MoveWolf.cs’  and  ‘WolfMovementVector’  to keep things friendly for a first exposure to code.
However, these are not good names.

This script could be pulled onto almost any GameObject, which certainly may not be a Wolf!
So, some renaming was done in (1) to make things more generic.
(The class name wasn't changed, since then the file would need renaming to match.
Don't worry—this script won't be used in our final game—our ‘real’ one will be better-named.)
Lines 8, 29, and part of 31
Line 8:
int  is the integer type.
DirectionMultiplier  will only hold two possible values, $\,1\,$ and $\,-1\,,$ which are both integers.

Line 29:
Recall:
DirectionMultiplier *= -1;
is a shorthand for
DirectionMultiplier = DirectionMultiplier * -1;
Part of Line 31:
Here is how you multiply a vector by a scalar:
$$ \overbrace{k}^{\text{scalar}} \overbrace{(x,y,z)}^{\text{vector}}\ \ \ := \overset{\text{every coordinate}} {\overbrace{(kx, ky, kz)}^{\text{is multiplied by the scalar}}} $$
Thus:
MovementVector * DirectionMultiplier
multiplies every coordinate of  MovementVector  by the current value of  DirectionMultiplier .

When a vector is multiplied by $\,-1\,,$ it changes the direction of the vector.
Since  DirectionMultiplier  is a public field, it is exposed in the Unity Editor.
It's fun to see  DirectionMultiplier  bouncing between $\,-1\,$ and $\,1\,$ as the character changes direction during game play.
Using General Components in C# Scripts
As mentioned earlier, every GameObject has a Transform Component,
so Unity makes it really easy to work with the Transform Component.
However, working with other Components requires a bit more coding.

Here's an analogy to help with understanding.
When you store your belongings, you first need the right size box for an item.
For example, a shoe box won't hold your Christmas wrapping paper.
Once you have the right size box, then you can put your stuff away.

It's the same way with Components other than the Transform Component.
There are two lines of code required to start working with them.
Think of the first line as ‘getting the right size box’.
Think of the second line as ‘putting your stuff in the box’.
Understanding Lines 9 and 19:
How to Access Sprite Renderer Component Information
Wolf has a Sprite Renderer Component with a Flip-X checkbox.
When unchecked, Wolf faces right.
When checked, Wolf faces left.
See (2a) and (2b) at right.
We need to access and change this Component information
in order to flip Wolf as it runs back-and-forth across the screen.
Low-Level Understanding of Lines 9 and 19
  • Line 9
    SpriteRenderer _mySpriteRenderer;
    This is a (private) field declaration.
    This gets the right size box for Sprite Renderer information,
    and names this box  _mySpriteRenderer .
    (Notice the underscore naming convention being used.)
  • Line 19
    _mySpriteRenderer = GetComponent<SpriteRenderer>();
    This is an assignment statement.
    This gets Wolf 's Sprite Renderer Component information,
    and puts it into the  _mySpriteRenderer  box.

(2a) Wolf-Inspector-Sprite Renderer-Flip-X
unchecked (facing right)

(2b) Wolf-Inspector-Sprite Renderer-Flip-X
checked (facing left)
Higher-Level Understanding of Lines 9 and 19
This explanation is a bit closer to the truth.
At right are three ‘index cards’.
Think of them as representing chunks of memory where information is stored.
(There's lots of other information on these cards, but we're only showing what's relevant to this discussion.)
  • When the Wolf GameObject was created, card A was created,
    along with entry A1.
  • When the Sprite Renderer Component was added to Wolf:
    • Card B was created, with:
      • entry B1 to refer back to Wolf
      • entry B2 as an initial value for flipX
    • Entry A2 was added to refer to card B.
  • When the C# Script MoveWolf was created, card C was created,
    along with entry C1.
  • When MoveWolf.cs was pulled onto Wolf, entry C2 was added.
  • When Line 9 was added to the MoveWolf.cs file, entry C3 was added, with an initial value of  null .
  • When Line 19 is executed, the  null  value in C3 is changed to a reference to card B.
    Line 19 is executed when the  Start()  method is called during game play.
Note:
Line 9 happens at compile time, when the game is built.
Line 19 happens only after the game starts running.
A
GameObject

A1: Name: Wolf
A2: Sprite Renderer Component reference to B
B
Sprite Renderer Component

B1: GameObject: Wolf
B2: flipX false
C
C# Script

C1: Name: MoveWolf
C2: GameObject: reference to Wolf
C3: _mySpriteRenderer null
Moving Wolf Back-and-Forth Across the Screen (continued)
The code to move Wolf back-and-forth is repeated in (1) at right, for your convenience.
Booleans
A boolean value is either true or false.
In C# code:
  • bool  represents the boolean type
  • reserved identifiers for truth values:
    true
    false
Before continuing, make sure you fully understand the truth table information in
Practice With the Mathematical Words ‘and’, ‘or’, ‘is equivalent to’ .
Boolean Operators
Negation
negation
A !A
T F
F T
Note:   ‘!A’  is read as  ‘not A’ 

Line 28:
If  _mySpriteRenderer.flipX  is false (unchecked box; Wolf facing right),
then  !_mySpriteRenderer.flipX  is true.

If  _mySpriteRenderer.flipX  is true (checked box; Wolf facing left),
then  !_mySpriteRenderer.flipX  is false.

In both cases, the new truth value gets stored back in  _mySpriteRenderer.flipX ,
which updates the Sprite Renderer Component and causes Wolf to change the direction it is facing.

(1) the code to move  Wolf  back-and-forth repeatedly
a text file containing this MoveWolf code
AND, OR, EXCLUSIVE OR, EQUIVALENCE
operands AND short-circuit AND OR short-circuit OR EXCLUSIVE OR EQUIVALENCE
A B A & B A && B A | B A || B A ^ B ==
T T T T T T F T
T F F F T T T F
F T F F T T T F
F F F F F F F T
  an AND sentence is true
only when BOTH operands are true
an OR sentence is true
when ONE or BOTH operands are true
an EXCLUSIVE OR is true
only when EXACTLY ONE operand is true
an EQUIVALENCE is true
when the operands have the SAME truth values
The Short-Circuit Boolean Operators
Both  &  and  &&  return the same truth values. (See the blue columns above.)
Both  |  and  ||  return the same truth values. (See the green columns above.)
Here's the difference: The short-circuit operators are slightly more efficient, if there is no need to evaluate both operands.
Note: Both operands are always evaluated for both the EXCLUSIVE OR and EQUIVALENCE.
Conditionals
Conditional statements/expressions perform different actions,
depending on whether a programmer-specified boolean condition evaluates to true or false.

if() { }
The ‘ if ’ statement is the simplest conditional statement.
Here are details:
if(BooleanCondition)
{
  // Let  BODY  refer to the statements between the braces.
  // If  BooleanCondition  is true,  then  BODY  is executed.      Then, control passes to the next statement in the flow.
  // If  BooleanCondition  is false, then  BODY  is NOT executed.  Instead, control passes immediately to the next statement in the flow.
}
// This is the next statement in the flow.
Lines 26–30:
For us, the  BooleanCondition  is:
transform.position.x > 10.0f || transform.position.x < -10.0f
This is a short-circuit OR.
It returns  true  if  Wolf 's  current position is beyond either the right or left edge of the screen.
(Note: The right/left screen edges are controlled by the size of Main Camera.)
In either case, Wolf gets flipped, and the field that controls movement direction gets changed.

The next statement in the flow (line 31) actually moves Wolf with the (possibly) new settings.

Get totally comfortable with all this code.
When you're ready, move on to the next part of this lesson.

Continue with this Unity lesson: Uniform Motion in Any Direction