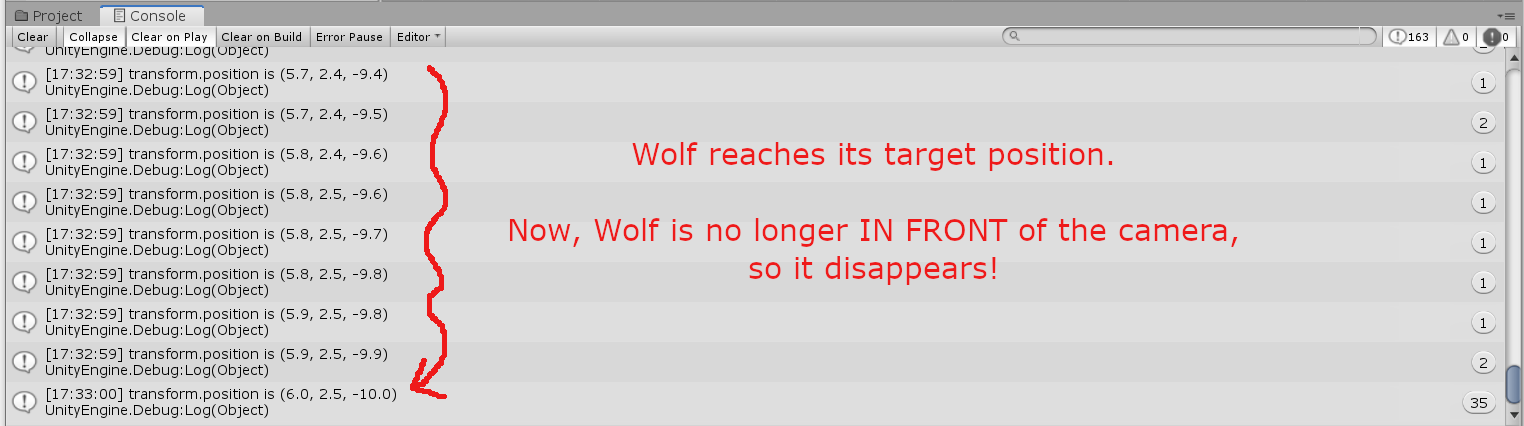
UNITY Lesson 1: Table of Contents
1a: Get Unity; Get Started
1b: Add a Character
1c: An Introduction to Scripting in C#
1d: Uniform Motion in Any Direction
1e: Move To a User-Clicked Location
1f: Background and Falling Rocks

UNITY Lesson 1e:
Move To a User-Clicked Location

SCREEN SPACE
With already-covered concepts, Wolf can move at a constant speed in a specified direction.
The movement is not dependent on framerate, so it looks the same regardless of the user's platform.

Our current goal is for Wolf to move to a user-clicked location.
Capturing mouse-click information uses Screen Space:
Screen Space Attributes
  • Screen Space is two-dimensional (2D).
    (You can't move your mouse pointer into or out of the screen!)
  • Screen Space coordinates are measured in pixels.
  • The Screen Space origin (0,0) is at the lower left corner of the screen.
  • Positive directions for Screen Space axes: to the right; up
  • The upper right of the currently-active screen is (Screen.width , Screen.height).
  • ScreenToWorldPoint()   is used to change from Screen Space coordinates
    to World Space coordinates.
A Simple Script to Understand Screen Space
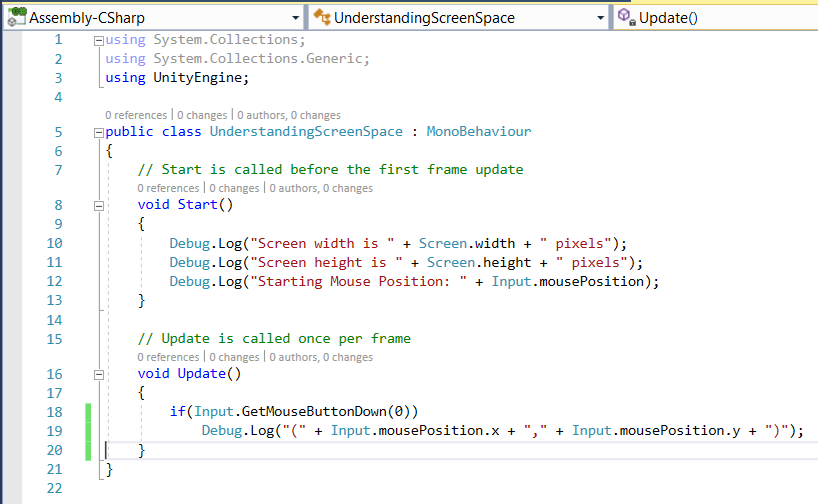
  • Remove (or uncheck) all optional components on Wolf other than Sprite Renderer.
  • Create a new script in your Project-Assets-Scripts folder:   Project-Create-C# Script
    Name the script (say): UnderstandingScreenSpace
    Drag the script onto Wolf.
  • Edit the script to match (1) at right.
    • line 12:
      Input.mousePosition  returns a  Vector3 :
      • the first two coordinates ($\,x\,$ and $\,y\,$) are the Screen Space coordinates of the current mouse position
      • The $\,z\,$-value of  Input.mousePosition  is always zero.
    • line 18:
      Input.GetMouseButtonDown(0)
      Returns  true  during the frame the user presses the given mouse button.
      For me, the integer  button  value of  0  corresponds to the left mouse button.
    • When Can You Omit Curly Braces in an ‘If’ Statement?
      line 19:
      If there is only a single statement in the body of a C#  ‘if () { }’  statement, then the curly braces can (optionally) be omitted.
    • line 19:
      Vector3.x ,   Vector3.y
      Each returns a float containing the specified coordinate of  Vector3.
  • Play the game to run the script.
    Some sample console output is shown below.
  • Change the size of your screen and play the game again to see different output.

(1) the  UnderstandingScreenSpace.cs  script
a text file containing this UnderstandingScreenSpace code

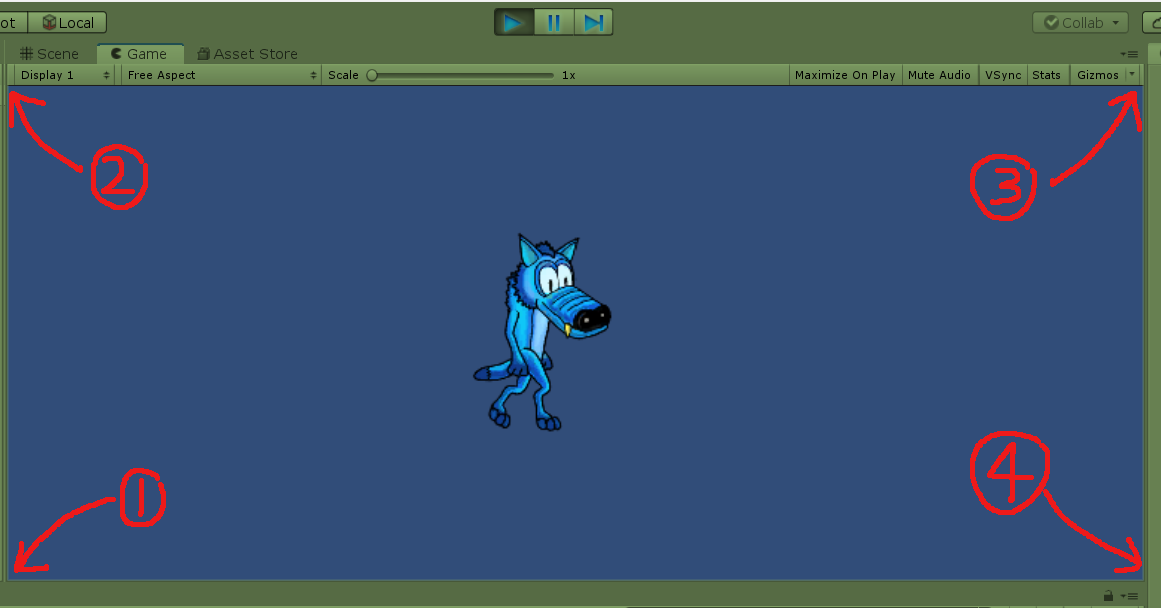
The screen is dark blue.
My four approximate clicked corners are shown.

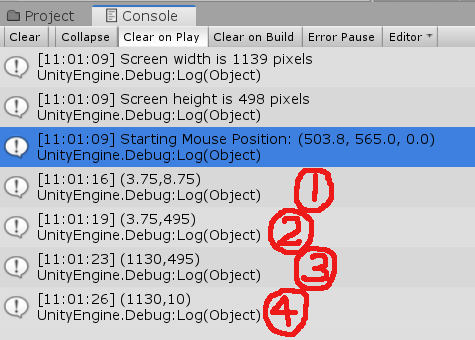
sample console output

Starting Mouse Position
gives the Screen Space coordinates of my  Play  button.

I left-mouse-clicked the four (approximate) screen corners, in this order:
(1) lower left corner
(2) upper left corner
(3) upper right corner
(4) lower right corner
CAMERAS
For reference:
Basic Information on Cameras
  • User Views World Through a Camera
    The user views the game world through a camera.
    A camera displays scene content to the user.
  • Main Camera
    When a new scene is created, a Main Camera component is always included.
  • No Active Camera? You See Nothing!
    Unless you have an active camera, you won't see anything when you play the game.

    Try this experiment:
    • Select Main Camera in Hierarchy.
    • Uncheck Main Camera in Inspector, to (temporarily) remove this component. Immediately, your Camera Preview will disappear.
    • Play the game.
      You'll see something like the message in (1) at right.
    • Be sure to enable (check) the Main Camera component when you're done!

(1) Uncheck the Main Camera component.
When there's no active camera, then nothing is visible!

(For understanding the next script, take note of the  MainCamera  tag!)
MOVE TO A USER-CLICKED LOCATION
This is our first script to use the  Camera  class.
  • Remove (or uncheck) all optional components on Wolf other than Sprite Renderer.
  • Create a new script in your Project-Assets-Scripts folder.
    Name the script (say): MoveToClickedLocation
    Drag the script onto Wolf.
  • Edit the script to match (1) at right.
Going through this lesson in order?
Then, almost all the code in (1) is familiar.
Here are the new concepts:
  • line 22
    • Input.mousePosition  returns a  Vector3  (with $\,z = 0\,$).
    • Since everything the user sees is through a camera, it makes sense that the  Camera  class should be used for things that are visible (like the mouse pointer).
    • You must always specify which camera you're using.
      Camera.main  gets a reference to the first enabled camera that is tagged   MainCamera.
    • Camera.main.ScreenToWorldPoint()  requires a  Vector3  input (our mouse position) and returns a  Vector3  output (the mouse position, converted to World coordinates).
    • The third coordinate of  _target  is the $z$-value of Main Camera.
  • line 26
    Vector2.MoveTowards()  is a convenient Unity method to move from one point to another in two-dimensional space (for us—the game screen).
    Vector2.MoveTowards()  requires three inputs:
    • First input: a  Vector2  giving the current position.
      Since  transform.position  is  Vector3 , the third coordinate is discarded.
    • Second input: a  Vector2  giving the target position.
      Since  _target  is  Vector3 , the third coordinate is discarded.
    • Third input: a  float  giving the maximum distance to move each frame. Recall that distance equals rate times time.
    Vector2.MoveTowards()  returns a  Vector2 .
    Since  transform.position  requires Vector3 , $\,0\,$ is appended as the third coordinate.
Try It!
Play the game!
Click anywhere, and watch Wolf move to that location.
You can adjust the speed with the public  TravelSpeed  variable.
How cool is that?

(1) the   MoveToClickedLocation.cs  script
a text file containing this MoveToClickedLocation code
A CLOSER LOOK AT THE PREVIOUS SCRIPT
You might be curious as to why we didn't just use  Vector3.MoveTowards()  in our  MoveToClickedLocation.cs  script.

Try it—change  Vector2  to  Vector3  as shown in (1) at right.

Unless you make other compensating changes, you'll see  Wolf  move towards its first target ... and disappear, never to be seen again (until you stop playing the game)!

Some added  Debug.Log()  statements reveal what's happening.
See (2a) and (2b) below.
  • (2a) Observe that  Console-Collapse is selected. This causes only the first instance of recurring messages to be shown, making it easier to parse the output.
  • (2a) About $\,70\,$ frames lapsed before I mouse-clicked to set the target position. During this time,  Wolf  was at position $\,(0,0,3)\,.$
  • (2a) I clicked on the point with World coordinates: $\,x = 6.0\,,$ $\,y = 2.5\,$
    Camera.main.ScreenToWorldPoint() sets the $z$-value to match  Main Camera , which is $\,-10.0\,.$ Thus:  _target = (6.0,2.5,-10.0) 
  • (2a) Wolf  moves uniformly along a straight line path from $\,(0,0,3)\,$ to $\,(6,2.5,-10)\,$:
    • $x\,$ must increase by $\,6\,,$ since $\,6 - 0 = 6\,$
    • $y\,$ must increase by $\,2.5\,,$ since $\,2.5 - 0 = 2.5\,$
    • $z\,$ must decrease by $\,13\,,$ since $\,-10 - 3 = -13\,$
    Accordingly, note that the $z$-value changes most rapidly; the $y$-value changes most slowly.
  • (2b) Wolf  arrives at the target. Because of my near clipping plane setting, Wolf  disappears when its $z$-value is less than $\,-9.7\,$ (too close to the camera). So, Wolf  actually disappears a few frames before it reaches its target.
  • Any future mouse-clicks produce a target with a $z$-value of $\,-10\,,$ which is why Wolf  never re-appears during game play.

(1) Make some changes to the  MoveToClickedLocation.cs  script:
change  Vector2  to  Vector3 ;
add the two indicated  Debug.Log()  lines.

(2a) Wolf starts moving towards its target position ...

(2b) ... and arrives!

Continue with this Unity lesson: Background and Falling Rocks