Today's lesson talks about a tag that can make
your web pages more colorful, more animated (and—if you're
not careful—more annoying).
Lots of the information for this card was obtained from the FUNKY CHICKENS web
site, which was created in December 1999 to help teach HTML (HyperText Markup Language).
I highly recommend it! Check it out!
Funky Chickens (the link I had is no longer valid)
INDEX CARDS #9.5:
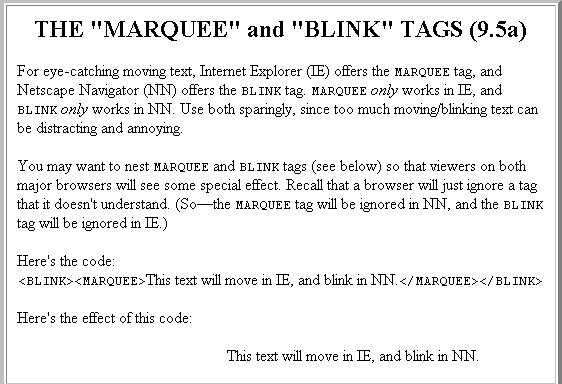
THE "MARQUEE" and "BLINK" TAGS (9.5a)
For eye-catching moving text, Internet Explorer (IE) offers the MARQUEE tag, and Netscape
Navigator (NN) offers the BLINK tag. MARQUEEonly works in IE, and
BLINKonly works in NN. Use both sparingly, since too much
moving/blinking text can be distracting and annoying.
You may want to nest MARQUEE and BLINK tags (see below) so that viewers on
both major browsers will see some special effect. Recall that a browser will
just ignore a tag that it doesn't understand. (So—the MARQUEE tag will
be ignored in NN, and the BLINK tag will be ignored in IE.)
Here's the code:
<BLINK><MARQUEE>This text will move in IE, and
blink in NN.</MARQUEE></BLINK>
Here's the effect of this code:
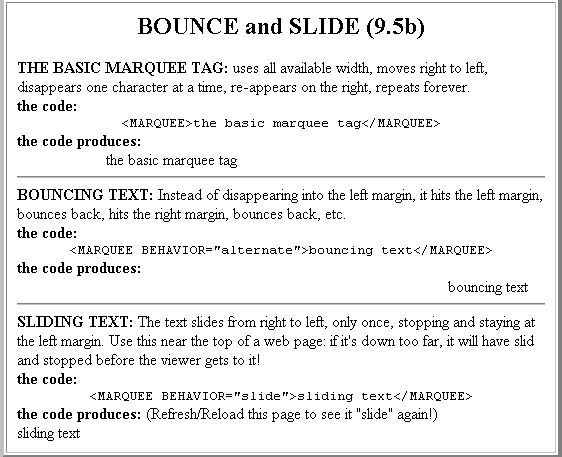
BOUNCE and SLIDE (9.5b)
THE BASIC MARQUEE TAG: uses all available width, moves right to left,
disappears one character at a time, re-appears on the right, repeats forever.
the code:
<MARQUEE>the basic marquee tag</MARQUEE>
the code produces: BOUNCING TEXT: Instead of disappearing into the left margin, it hits the
left margin, bounces back, hits the right margin, bounces back, etc.
the code:
the code produces: SLIDING TEXT: The text slides from right to left, only once, stopping and staying
at the left margin. Use this near the top of a web page: if it's down too far, it will
have slid and stopped before the viewer gets to it!
the code:
<MARQUEE BEHAVIOR="slide">sliding text</MARQUEE>
the code produces: (Refresh/Reload this page to see it "slide" again!)
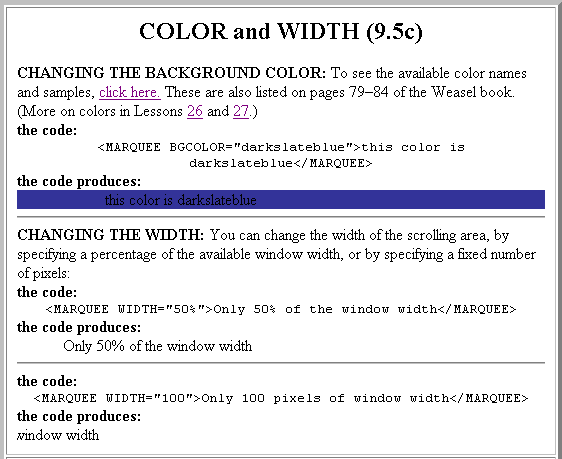
COLOR and WIDTH (9.5c)
CHANGING THE BACKGROUND COLOR:
Colors are listed on pages 79–84 of the Weasel book. (More on colors in
Lessons 26 and 27.)
the code:
<MARQUEE BGCOLOR="darkslateblue">this color is darkslateblue</MARQUEE>
the code produces: CHANGING THE WIDTH: You can change the width of the scrolling area, by specifying a
percentage of the available window width, or by specifying a fixed number of pixels:
the code:
<MARQUEE WIDTH="50%">Only 50% of the window width</MARQUEE>
the code produces: the code:
<MARQUEE WIDTH="100">Only 100 pixels of window width</MARQUEE>
the code produces:
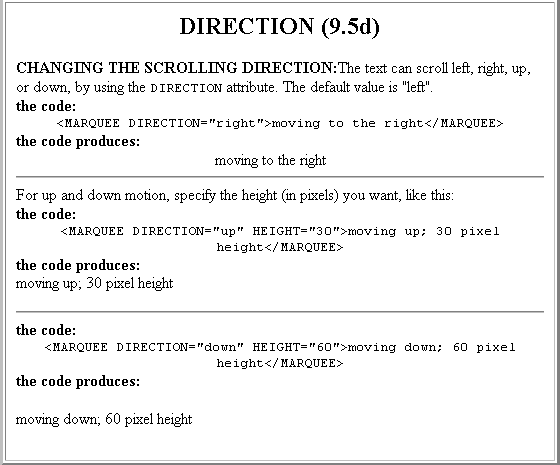
DIRECTION (9.5d)
CHANGING THE SCROLLING DIRECTION:The text can scroll left, right, up, or down, by
using the DIRECTION attribute. The default value is "left".
the code:
<MARQUEE DIRECTION="right">moving to the right</MARQUEE>
the code produces:
For up and down motion, specify the height (in pixels) you want, like this: the code:
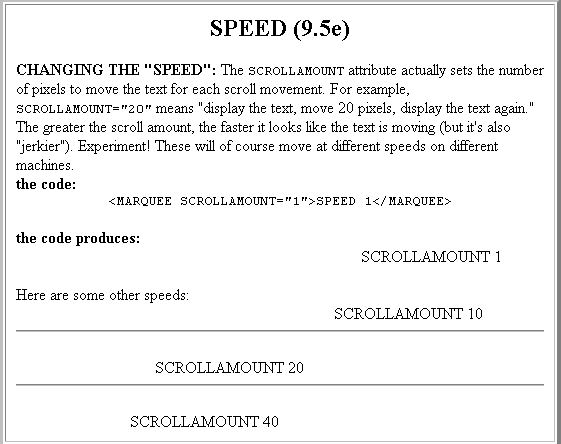
CHANGING THE "SPEED": The SCROLLAMOUNT attribute actually sets the
number of pixels to move the text for each scroll movement. For example, SCROLLAMOUNT="20"
means "display the text, move 20 pixels, display the text again." The greater the scroll amount,
the faster it looks like the text is moving (but it's also "jerkier"). Experiment!
These will of course move at different speeds on different machines.
the code:
<MARQUEE SCROLLAMOUNT="1">SPEED 1</MARQUEE>
the code produces:
Here are some other speeds:
LOOPS and DELAYS (9.5f)
SPECIFYING THE NUMBER OF LOOPS: You can specify how many "loops" there will
be, before the text disappears:
the code:
<MARQUEE LOOP="3">3 loops, then stop. Reload the page to see!</MARQUEE>
the code produces: DELAY BETWEEN MOVEMENTS: You can specify a delay, in milliseconds, between
successive movements of the text. There are 1000 milliseconds in 1 second.
the code:
<MARQUEE DELAY="500">500 ms delay between movements</MARQUEE>
the code produces:
Here are some other delays, and scrollamount/delay combinations:
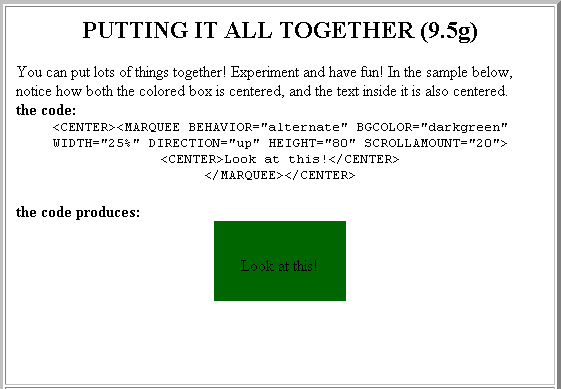
PUTTING IT ALL TOGETHER (9.5g)
You can put lots of things together! Experiment and have fun! In the sample below,
notice how both the colored box is centered, and the text inside it is also centered.
the code:
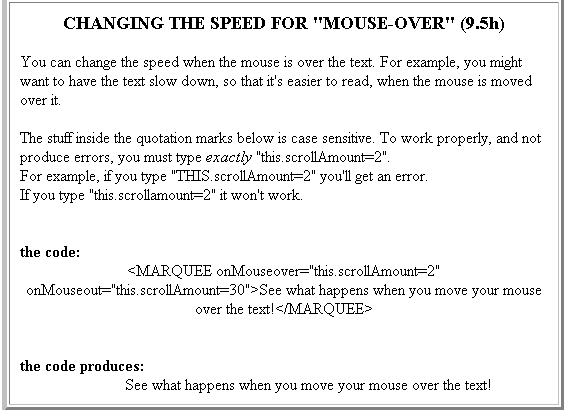
You can change the speed when the mouse is over the text. For example, you might want to have the
text slow down, so that it's easier to read, when the mouse is moved over it.
The stuff
inside the quotation marks below is case sensitive. To work properly, and not produce errors, you must type
exactly "this.scrollAmount=2".
For example, if you type "THIS.scrollAmount=2" you'll get an error.
If you type "this.scrollamount=2" it won't work.
the code:
<MARQUEE onMouseover="this.scrollAmount=2"
onMouseout="this.scrollAmount=30">See what happens when you move your mouse over the text!</MARQUEE>