http://fishcaro.crosswinds.net/day_42_css_basics.htm
INDEX CARD #42:
SYNTAX FOR STYLE SHEET RULES (42a)The property is something that can be specified for the selector. The value gives specific information about the property. Together, a property: value pair is called a declaration. Be sure to put a space after the colon in each property: value pair. Multiple declarations are separated by semicolons, as in the next example. Here's an example: There are two declarations: font-size: 12 pt and color: red . In the first declaration, the property is font-size and its value is 12 pt; this sets the font-size of paragraphs to be 12 pt. In the second declaration, the property is color and its value is red; this makes all paragraphs appear in red. |
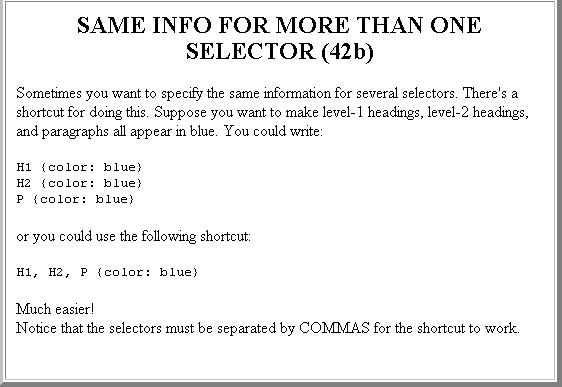
SAME INFO FOR MORE THAN ONE SELECTOR (42b)H1 {color: blue}
H2 {color: blue}
P {color: blue}
or you could use the following shortcut:
H1, H2, P {color: blue}
Much easier!
Notice that the selectors must be separated by COMMAS for the shortcut to work. |
CONTEXTUAL SELECTORS (42c)The order is important: the list item ( LI) must come first; then the
emphasized text (EM) must appear inside the list item.
The individual selectors (here, LI and EM) must be separated by WHITE SPACE ONLY (no commas) for this to work. Sometimes you want more than one contextual selector to have the same declaration. For example, suppose you want bold text to be colored red whenever it appears inside level-1 headings, level-2 headings, and level-3 headings. Then, you could write: |
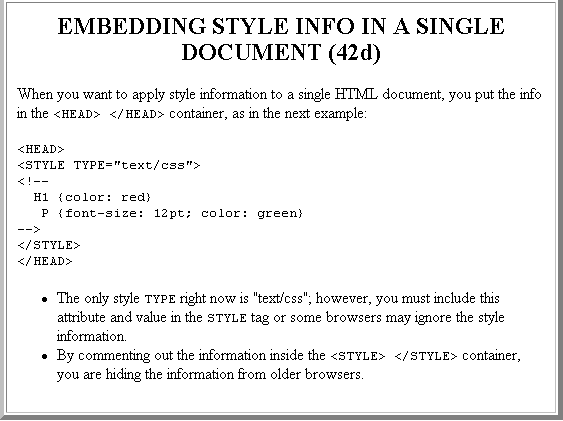
EMBEDDING STYLE INFO IN A SINGLE DOCUMENT (42d)<HEAD> </HEAD> container, as in the next example:
<HEAD>
<STYLE TYPE="text/css">
<!--
  H1 {color: red}
   P {font-size: 12pt; color: green}
-->
</STYLE>
</HEAD>
|
Printable version of Index Card 42a
Printable version of Index Card 42b
Printable version of Index Card 42c
Printable version of Index Card 42d
WORKSHEET #42:
ASSIGNMENT #42: