This lesson presents some loose ends that are important, but just
haven't yet been discussed.
You'll need 3 index cards (6 sides) for today's lesson.
INDEX CARDS #24:
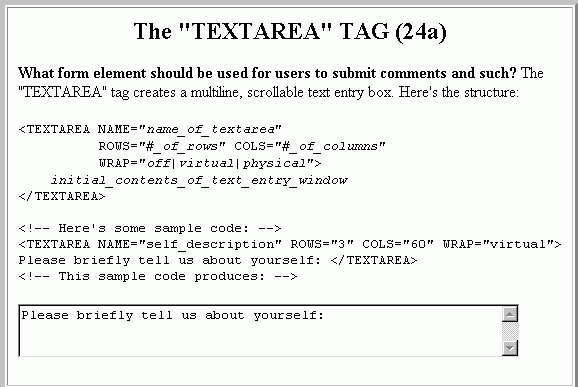
The "TEXTAREA" TAG (24a)
What form element should be used for users to submit comments and such?
The "TEXTAREA" tag creates a multiline, scrollable text entry box. Here's
the structure:
<TEXTAREA NAME="name_of_textarea"
          ROWS="#_of_rows" COLS="#_of_columns"
          WRAP="off|virtual|physical">
    initial_contents_of_text_entry_window
</TEXTAREA>

<!-- Here's some sample code: -->
<TEXTAREA NAME="self_description" ROWS="3" COLS="60" WRAP="virtual">
Please briefly tell us about yourself: </TEXTAREA>
<!-- This sample code produces: -->
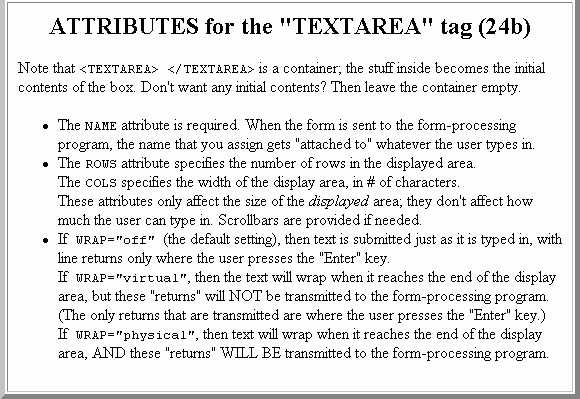
ATTRIBUTES for the "TEXTAREA" tag (24b)
Note that <TEXTAREA> </TEXTAREA> is a container;
the stuff inside becomes the initial contents of the box. Don't want any initial
contents? Then leave the container empty.
The NAME attribute is required. When the form is sent to the
form-processing program, the name that you assign gets "attached to" whatever
the user types in.
The ROWS attribute specifies the
number of rows in the displayed area.
The COLS specifies the width
of the display area, in # of characters.
These attributes only affect the
size of the displayed area; they don't affect how much the user
can type in. Scrollbars are provided if needed.
If WRAP="off" (the default setting), then text is submitted
just as it is typed
in, with line returns only where the user presses the "Enter" key.
If WRAP="virtual", then the text will wrap when it reaches
the end of the display area, but these "returns" will NOT be transmitted
to the form-processing program. (The only returns that are transmitted
are where the user presses the "Enter" key.)
If WRAP="physical", then text will wrap when it reaches the
end of the display area, AND these "returns" WILL BE transmitted to the
form-processing program.
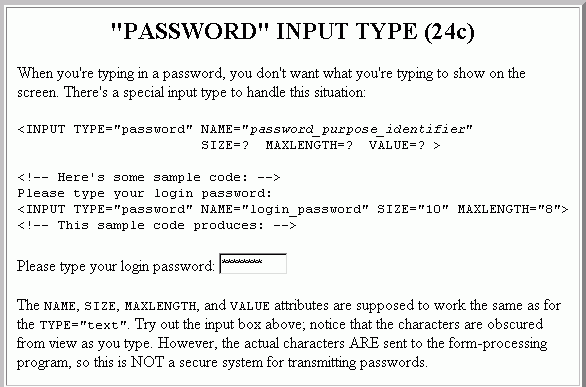
"PASSWORD" INPUT TYPE (24c)
When you're typing in a password, you don't want what you're typing to
show on the screen. There's a special input type to handle this
situation:
<INPUT TYPE="password" NAME="password_purpose_identifier"
                       SIZE=?  MAXLENGTH=?  VALUE=? >

<!-- Here's some sample code: -->
Please type your login password:
<INPUT TYPE="password" NAME="login_password" SIZE="10" MAXLENGTH="8">
<!-- This sample code produces: -->
The NAME, SIZE, MAXLENGTH, and
VALUE attributes are supposed to work the same as for the TYPE="text".
Try out the input box above; notice that the characters are obscured from view
as you type. However, the actual characters ARE sent to the form-processing
program, so this is NOT a secure system for transmitting passwords.
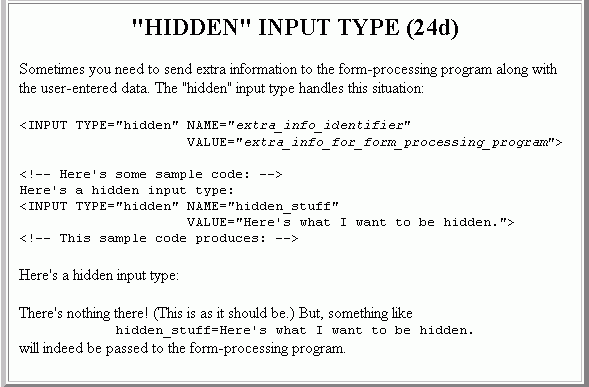
"HIDDEN" INPUT TYPE (24d)
Sometimes you need to send extra information to the form-processing
program along with the user-entered data. The "hidden" input type handles
this situation:
<INPUT TYPE="hidden" NAME="extra_info_identifier"
                     VALUE="extra_info_for_form_processing_program">

<!-- Here's some sample code: -->
Here's a hidden input type:
<INPUT TYPE="hidden" NAME="hidden_stuff"
                     VALUE="Here's what I want to be hidden.">
<!-- This sample code produces: -->
There's nothing there! (This is as it should be.) But, something like
hidden_stuff=Here's what I want to be hidden.
will indeed be passed to the form-processing program.
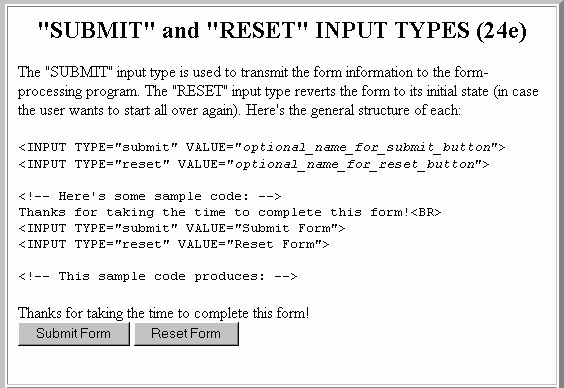
"SUBMIT" and "RESET" INPUT TYPES (24e)
The "SUBMIT" input type is used to transmit the form
information to the form-processing program. The "RESET" input type
reverts the form to its initial state (in case the user wants to start
all over again). Here's the general structure of each:
<INPUT TYPE="submit" VALUE="optional_name_for_submit_button">
<INPUT TYPE="reset" VALUE="optional_name_for_reset_button">

<!-- Here's some sample code: -->
Thanks for taking the time to complete this form!<BR>
<INPUT TYPE="submit" VALUE="Submit Form">
<INPUT TYPE="reset" VALUE="Reset Form">

<!-- This sample code produces: -->
IMAGE SUBMIT BUTTON (24f)
You can replace the SUBMIT button with an image, if desired:
(W24.1) Please complete the online tutorial located at:
http://www.cwru.edu/help/interHTML/toc.html (link is no longer valid)
Read Chapter 8 (Forms Cleanup) and do the exercises at the end
of Chapter 8. Some of the material is outdated in this section; again,
this gives some good historical perspective.
ASSIGNMENT #24:
(A24.1) Please re-read the sections on "Password text entry" and "Hidden entry"
on pages pages 236–237 of the Weasel Book. Also read
pages 238–240 (from "Submit and reset buttons" up to "Creating Menus
with the <select> tag").
(A24.2) Try out the <INPUT TYPE="submit"> and <INPUT TYPE="reset">
without the optional VALUE attribute, using both Internet Explorer and
Netscape Navigator. What do the buttons say, by default?
(A24.3) There are lots of free button graphics (and more!) at:
http://www.grsites.com/webgraphics/ (link is no longer valid)