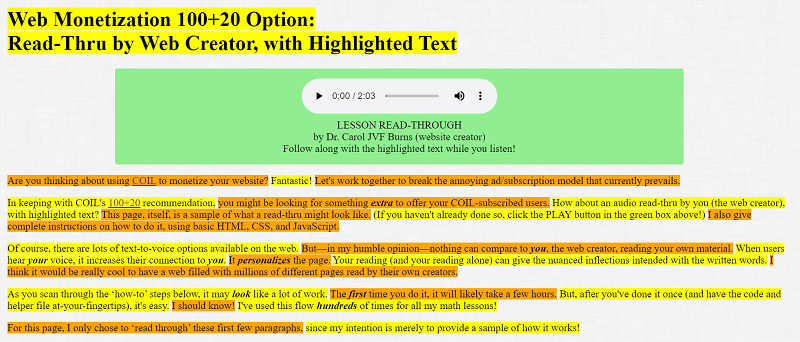
Are you thinking about using COIL to monetize your website? Fantastic! Let's work together to break the annoying ad/subscription model that currently prevails.
In keeping with COIL's 100+20 recommendation, you might be looking for something extra to offer your COIL-subscribed users. How about an audio read-thru by you (the web creator), with highlighted text? This page, itself, is a sample of what a read-thru might look like. (If you haven't already done so, click the PLAY button in the green box above!) I also give complete instructions on how to do it, using basic HTML, CSS, and JavaScript.
Of course, there are lots of text-to-voice options available on the web. But—in my humble opinion—nothing can compare to you, the web creator, reading your own material. When users hear your voice, it increases their connection to you. It personalizes the page. Your reading (and your reading alone) can give the nuanced inflections intended with the written words. I think it would be really cool to have a web filled with millions of different pages read by their own creators.
As you scan through the ‘how-to’ steps below, it may look like a lot of work. The first time you do it, it will likely take a few hours. But, after you've done it once (and have the code and helper file at-your-fingertips), it's easy. I should know! I've used this flow hundreds of times for all my math lessons!
For this page, I only chose to ‘read through’ these first few paragraphs, since my intention is merely to provide a sample of how it works!
This option won't work for a web page with frequently-changing content. You don't want to keep making new recordings!
You need to be able to edit your own HTML page, and then make that page ‘live’ with your changes (i.e., upload it to your server). You do NOT need to be an expert with HTML, CSS, or JavaScript! You'll just highlight-copy-paste little snippets of code that I'll give you, and make desired changes.
I use the free Windows Voice Recorder. You don't need anything fancy: just start recording, stop recording, and save. I prefer to say ‘hello’ at the beginning and ‘bye’ at the end, but that's of course up to you. Be sure to remember where you save the audio file and what you name it, because you'll need this filename/location info in a moment.
Highlight-copy-paste the following code into the <head></head> container of your HTML page.
If you already have a <style> container, then just add in these two style entries.
The style entry #audioRecordingDiv controls the appearance of the div that holds the audio player,
and #audioPlayer controls the audio player itself.
    <style type="text/css">

        #audioRecordingDiv {
            background-color: lightgreen;
            margin-bottom: 5px;
            margin-left: auto;
            margin-right: auto;
            padding: 15px;
            text-align: center;
            width: 70%;
        }

        #audioPlayer {
            padding-bottom: 5px;
        }

     </style>
Most of this is self-explanatory—change the style to make it your own.
The ‘margin-left: auto;’ and ‘margin-right: auto;’ centers your (less-than-full-width) div in the browser window.
Highlight-copy-paste the code below to the desired location inside the <body></body> container of your HTML page.
I personally put it immediately after the main heading.
Make appropriate changes to the code (see table below).
    <div id="audioRecordingDiv" data-nosnippet="true">
        <audio id="audioPlayer" controls>
            <source src="audioRecordingByWebCreator.m4a" type="audio/mp4" />
            Your browser does not support the audio element.
        </audio><br />
        LESSON READ-THROUGH<br />
        by Dr. Carol JVF Burns (website creator)<br />
        Follow along with the highlighted text while you listen!
    </div>
<div id="audioRecordingDiv" data-nosnippet="true"> |
‘ data-nosnippet="true" ’ tells Google not to include any contents of this div in its search results.
You probably don't want (say) ‘lesson read-through’ showing up as a description of this page.
|
<audio id="audioPlayer" controls></audio> |
Here's a good discussion of the audio tag. The controls attribute specifies that audio controls (like the play button) should be displayed.The text inside the <audio></audio> container is only displayed in browsers that do not support the audio element.
|
<source src="audioRecordingByWebCreator.m4a" type="audio/mp4" />
|
Change the filename (shown in red) to match the name/extension of your audio file. This example assumes that the HTML page and the audio file are in exactly the same folder in your directory structure. If not, you'll need to adjust the path accordingly. |
LESSON READ-THROUGH<br />
|
Change this as desired. Note that ‘<br />’ gives a line break. |
Highlight-copy-paste the code below into your HTML page, just before the closing body tag (</body>).
You don't need to worry about most of this code. (If you know JavaScript, it should be easy to see what it's doing.)
There are only three tiny parts that you'll need (or perhaps want)
to adjust, which are shown in red below.
<script type="text/javascript">
// timeMat = []; // you'll insert the time matrix in Step 9
var audio1 = document.getElementById("audioPlayer");
audio1.addEventListener("timeupdate", function () {
for (var i = 0; i < (timeMat.length - 1); i++) {
if (audio1.currentTime >= timeMat[i] && audio1.currentTime < timeMat[i + 1]) {
document.getElementById("s" + i).style.backgroundColor = "yellow"; // change if you want a different highlighting color for the read-thru
} else {
document.getElementById("s" + i).style.backgroundColor = "transparent";
}
}
});
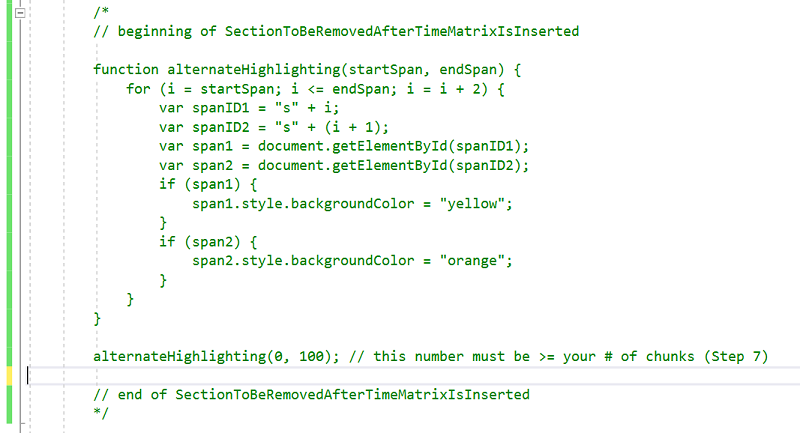
// beginning of SectionToBeRemovedAfterTimeMatrixIsInserted
function alternateHighlighting(startSpan, endSpan) {
for (i = startSpan; i <= endSpan; i = i + 2) {
var spanID1 = "s" + i;
var spanID2 = "s" + (i + 1);
var span1 = document.getElementById(spanID1);
var span2 = document.getElementById(spanID2);
if (span1) {
span1.style.backgroundColor = "yellow";
}
if (span2) {
span2.style.backgroundColor = "orange";
}
}
}
alternateHighlighting(0, 100); // this number must be >= your # of chunks (Step 7)
// end of SectionToBeRemovedAfterTimeMatrixIsInserted
</script>
This is the tedious part of the process.
Starting at the top of your content, and continuing to the end, indicate the ‘chunks’ of content that you want highlighted as you read.
You can use either <span></span> or <div></div> containers, as appropriate.
They will have identifiers s0, s1, s2, and so on.
For example, here is what the first few lines of content for this web page look like (where the containers appear in red):
    <h1>
    <span id="s0">
            Web Monetization 100+20 Option:<br />
            Read-Thru by Web Creator, with Highlighted Text
    </span>
    </h1>

    ...

    <p>
    <span id="s1">Are you thinking about using <a href="https://coil.com">COIL</a> to monetize your website?</span>
    <span id="s2">Fantastic!</span>
    <span id="s3">Let's work together to break the annoying ad/subscription model that currently prevails.</span>
    </p>
I use Visual Studio to edit my source code. Here's a free download for Visual Studio Community. It offers some time-saving shortcuts:
<div></div> container.div’ and type in the desired span info.
If you have more than $\,100\,$ chunks, then you must increase the number in this line of the JavaScript code:
alternateHighlighting(0, 100);
The number needs to be greater than or equal to your number of chunks.
After you've marked your chunks, saved your changes, and re-loaded your page in a browser,
you'll see your chunks alternately highlighted yellow/orange (see image below).
(If you don't see the highlighting immediately, then refresh the page.)
Keep this browser page with the alternate highlighting open—you'll use it in Step 9.
AudioTextSync.htmAudioTextSync.htm , in the same folder as your web page and audio file.htm’ (or ‘html’),
so it will be recognized as an HTML file.

<!DOCTYPE html>
<html>
<head>
    <meta charset="utf-8" />
    <title>Audio/Text Sync</title>
</head>

<body>

    <div>
        <audio id="audioPlayer" controls>
            <source src="audioRecordingByWebCreator.m4a" type="audio/mp4" />
            Your browser does not support the audio element.
        </audio>
    </div>

    <div id="putTimesHere"></div>

    <script type="text/javascript">

        audio1 = document.getElementById("audioPlayer");
        paragraph = document.getElementById("putTimesHere");
        paragraph.textContent = "timeMat = [0";

        // When you press the "a" key, it writes out the current time of the recording.
        // When you press the "z" key, it writes out the last time and closes the array.
        // Use this for listening to an audio file and getting the correct times for each chunk of content.
        document.addEventListener('keydown', function (e) {
            if (e.keyCode == 65) { // this is the "a" key
                paragraph.textContent += "," + Math.round(10 * audioPlayer.currentTime) / 10;
            }
            if (e.keyCode == 90) { // this is the "z" key
                paragraph.textContent += "," + Math.round(10 * audioPlayer.currentTime) / 10 + "];";
            }
        });

    </script>

</body>
</html>
AudioTextSync.htm to sync your audio file and content chunks
AudioTextSync.htm.timeMat matrix.AudioTextSync.htm side (on the left) before you press ‘a’!
AudioTextSync.htm :

SectionToBeRemovedAfterTimeMatrixIsInserted’ from your JavaScript code
You no longer want the alternating yellow/orange highlighting on your page—its purpose has been served!
So, comment out the ‘SectionToBeRemovedAfterTimeMatrixIsInserted’ code from your JavaScript,
by putting it between ‘/*’ and ‘*/’. Then, save your changes.
Refresh your web page in the browser, and test it out! When you play your audio, you should see the text following right along. Be sure to upload it your server. Enjoy!