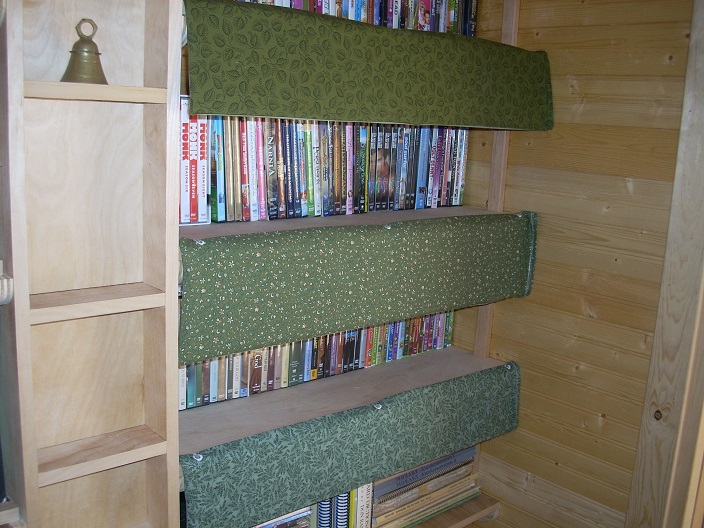
Fabric/Cardboard Bookshelf Dust Shields
These bookshelf dust shields are a piece of cardboard in a fabric pocket, hung by three tiny
Command decorating clips.
The cardboard adds stiffness and gives a wrinkle-free look; it is removable so the cover can be washed.
Gives a beautiful, clean look to ‘ragged’ tops of books and protects them from dust.
Cut up boxes from your Amazon purchases (or wherever)
for the cardboard.
-
Units:
All units are inches. For example, $\,h = 5.5\,$ denotes that $\,h\,$ is
5.5 inches.
-
Cut cardboard for dust shield:
Measure the width of the bookshelf ($\,w\,$), from inside left edge to inside right edge.
Use a height ($\,h\,$) that covers all the ‘ragged’ book tops (due to books with different heights).
I often use $\,h = 5.5\,$ or $\,h = 6.5\,.$
Cut a piece of cardboard that is $\,(w - \frac 12) \times h\,.$ (I use a rotary cutter
and straightedge.)
This cardboard is used in the next step as a template to cut the fabric.
-
Cut fabric to cover the cardboard:
Cut two identical-size pieces of fabric; width and length are given below.
You can use the same fabric for both: or, cut the front from one material, and the back from another.
WIDTH: 1.75" longer than your piece of cardboard (i.e., $\,w + 1.75\,$).
This allows for one side seam and the finished opening.
HEIGHT: 2.5" more than your piece of cardboard (i.e., $\,h + 2.5\,$).
This allows for a top and bottom seam, one inch extra at the top
(where the buttonholes to hang on the command clips go),
and a little extra for ease of cardboard insertion.
I just lay the cardboard on the fabric and use the markings on my cutting ruler to give the needed extra length/width.
-
Sew top, bottom, and left seam:
Put fabric pieces right sides together.
Sew 5/8" top and bottom seams.
Then, sew a 5/8" left seam.
-
Finish the opening (right edge):
Fold over and sew 3/8" on right edge, then fold and zig-zag 5/8" again.
This gives a finished edge for the opening where the cardboard is inserted (which is the right edge of the shelf).
Trim corners on left edge, if desired.
Turn right-side out, pushing corners out with (say) the eraser end of a pencil.
Press (iron).
-
Command clips on shelf for hanging:
On the top front edge of the shelf above the one being dust-protected,
put three tiny Command decorating clips (they come with 40 clips and 48 strips for
about \$6.00). Use three clips: 1" from the left, 1" from the right, and centered.
(You need to come in a bit from right and left, because you can't easily make the buttonholes
in the fabric too close to the edges.)
-
Buttonholes in fabric for hanging:
Hold the fabric up to the shelf and mark the positions for the three holes.
I use a flower stitch attachment to get a circular hole, but you can also use a small regular buttonhole.
The opening of the hole should be one-half inch from the top edge of the fabric.
Insert the cardboard and hang!
-
Optional Name Tags:
Use embroidery machine to make name tags. Be sure to use stabilizer sheet.
If your fabric is thin, then do NOT remove the stabilizer sheet, because it adds stiffness to the label.
Trim with a 1.5" inch margin on all sides.
Press a 1/4" seam, from right-to-wrong side, on long edges.
Press a 1/2" seam, from right-to-wrong side, on short edges.
With wrong sides together, sew as close as possible to edge on longest edge.
Press again, with writing centered (seam should be centered in back).
Zig-zag around the entire perimeter. (Some parts will be thick, so be careful!)
Attach with velcro to dust shield.